Consulting, Dynamics Operations Architecture, Featured
Dynamics Operations On-Premise Tutorials Part 5B: Service Fabric on 3 machines for Dynamics 365 On Premise
 8655
8655 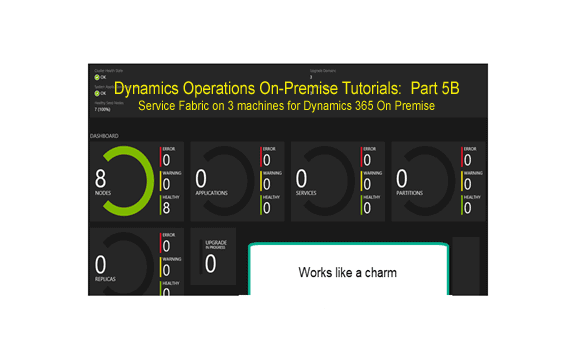
Aug
Disclaimer: Due to the lack of documentation on Service Fabric, it took me a lot longer than normal to figure out how to get Service Fabric and Dynamics 365 to work in a way that didn’t require up bunches of machines while still running well. It goes without say that some of the methods used in this post are 1000% unsupported by Microsoft. If you’ve gone through my series at this point, you are beginning to grasp the architecture of the new Dynamics 365 for Operations and Finance. You are thinking about nodes, security, sql always on configurations, hardware in house, etc. You may be new to service fabric (we all are at this point), but you are beginning to understand that it has very significant potential. Now, you are thirsting for the opportunity to see how it runs your baby, Dynamics 365 for Operations and Finance. The only thing is that you want to be able to control the resources a little better. This post is for you. Here we tackle the service fabric limitation of multiple machines with multiple nodes on each machine. A single machine with multiple nodes was always supported for development as well as one node for a machine in production. But we need to tackle a seemingly unsupported scenario here.
Now, what we will do here is throw 3 service fabric nodes on our AOS, 3 nodes on our always on SQL instance, and 2 nodes on our core SQL instance. That gives us 3 machines. If we wanted, we could have thrown our Active Directory stuff on the AOS but I left it off as it has been covered with a lot of good blog posts on how to play with ADFS. So, that gives us 3 machines to do our magic. And to throw a little more at you, notice how we will install a total of 8 nodes on the 3 machines. We can install as many as we want using this method but this was more than enough for the sandbox.
NOTE: ONCE AGAIN, YOU CAN DO THIS TUTORIAL from your own VMS just for the experience. You need 3 machines with 2 processors apiece and 8GB’s of RAM, maybe less.
First, let’s visit this site:
This is very important because you do need those prerequisites for the standalone version to work.
Second, get the JSON file ready for install but testing first.
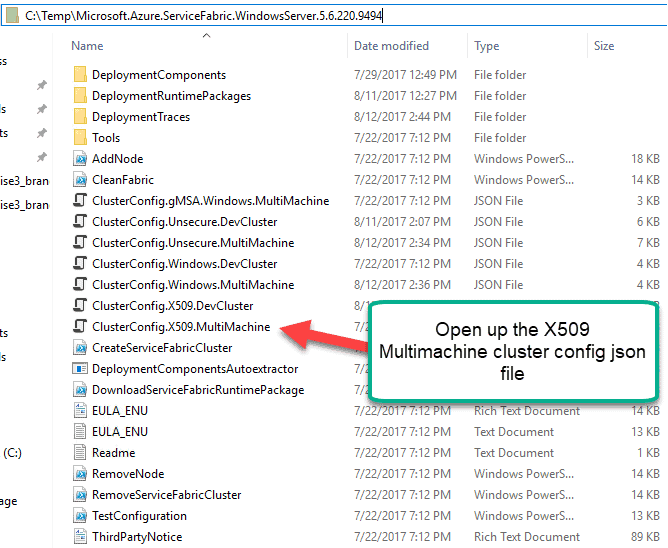
In the next critical part, we want to make sure that our JSON file is ready for install. So, let’s first open the multimachine json file. I recommend using a notepad type of free editor like Notepad++ or Notepadlight for the next part as we are about to drastically alter our install and you don’t want stuff like formatting and hidden spaces jacking up your install.
Here is the extracted file that I opened.
Third, let’s edit the node section first, starting with the node type, let’s create 8 nodes and distribute them across 3 machines
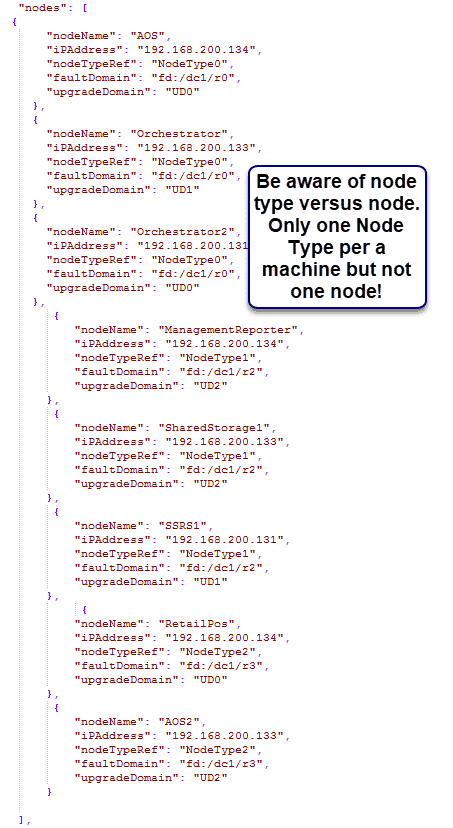
Okay, now, let’s explain what we are doing. First of all, you don’t need a node for all of these objects, but I couldn’t think of any other names so I went ahead and added SSRS and SharedStorage as names even though they don’t do anything here. But you could have named them anything. Here are the first things that you need to know:
| Name | Definition |
| Node | The way that service fabric communicates with the outside world by exposing ports and security on those ports |
| IP Address | The location of the machine where the node is hosted |
| NodeTypeRef | A type for the node where you can define ports and security. You arbitrarily name a nodetype depending on your own standards |
| FaultDomain | A data center concept where you specify areas of a data center. The idea is that all of your servers/nodes should not be located in the same place. So, if something bad happens, the likelihood of everything being down is low. Hence, you’ve heard of cloud providers have data centers all over the place. |
| UpgradeDomain | Downtime is our enemy. So, wouldn’t it be nice if we could bring some nodes down while leaving others up. That way, our service never goes down even during an upgrade. Sadly, Dynamics 365 for Operations and Finance is nowhere close to this but it’s a cool concept. Perhaps, we could utilize this in our integrations. |
Both upgrade domains and Fault domains are naming standards that you introduce via best practice data center standards. The FD or UD stuff corresponds to areas or designated applications. However, I just gave them some proprietary made-up names here. You’ll see them in action soon.
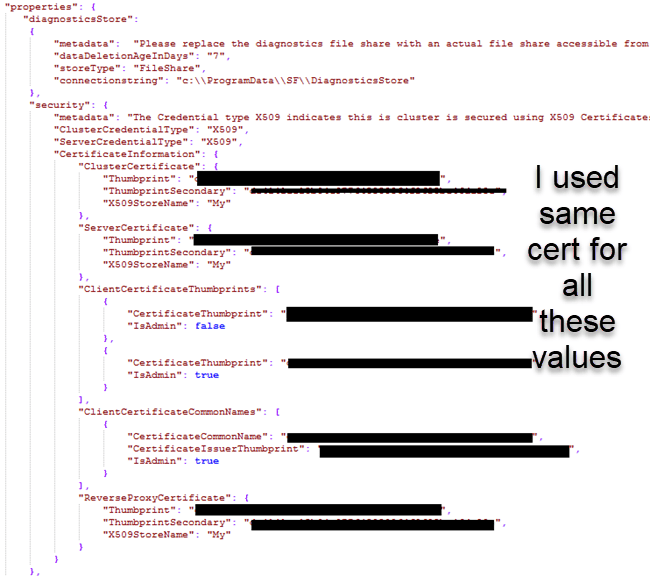
Fourth, Add the thumbprint into the security section:
Two posts ago, I went through an absurd amount of time carefully detailing how to get a certificate, generate a key, and even use the modern good security (Part 4 of this series). You need those skills here to generate a certificate. I named the certificate daxonpremise.brandonahmadlabs.com. I will use it here for the cluster only. Fear not, our wildcard will come back into play but not here. Also, more than once, I’ve detailed how to go into the certificate store and add a role that has permissions to the certificate but hang on that part for now. I want to show you a neat little trick later on. I used a certificate called daxonpremise.brandonahmadlabs.com. Remember, you will need to generate your own certificate, but this will be quite easy if you read my previous posts.
Don’t forget to manually type in the thumbprint value from the first place you add it in and then copy and paste after that to avoid thumbprint spacing drama.
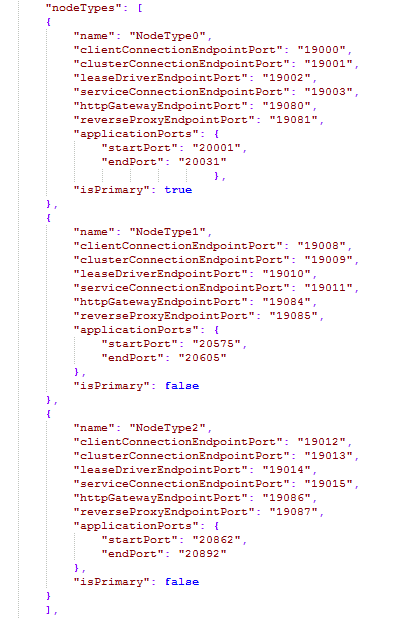
Fifth, Add the relevant nodetypes
This is actually too many nodes types here ,but I needed to prove my point. The rules for nodes are pretty simple. You choose any name you want for each node type so long as it is unique. You choose ports also so long as they are free and also unique per a node type. The applications ports start and stop port range needs to be at least 255. This
And important. Each of the emulated nodes on the same machine requires the same ports, etc. So, make sure you add them.
The node type concept is pretty sweet and really has a much stronger application when we add the concept of containers, these independent applications that can run apart from each other on the same OS. So, for example, if the AOS were truly written to best practices for microservices, we would be able to run 10 of them on one operating system installation so long as each one was on a separate node. Unfortunately, Dynamics 365 doesn’t support this awesome container functionality yet, but we can still utilize nodes in an unsupported way to save some serious machine resources. The key is that the programs mapped to each node (one program per a node) .
As a side note, the lack of full support for multiple nodes along with the weaker telemetry is why most people say that the Azure based version of Service Fabric is about a year behind the current open source tools out there for microservices. That’s true, but Microsoft keeps coming out with new features every week. It’s just that many of the applications haven’t been written to take advantage of those features. It’s the reason why we have to utilize this hack rather than just using containers, which are the solution for testing out multiple software versions and instances on one Operating System.
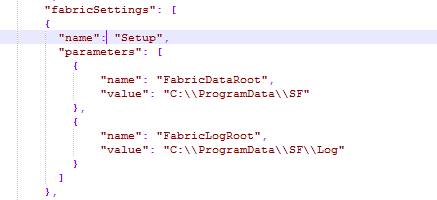
Sixth, alter the fabric settings to make the cluster work as a multimachine multiple node supported instance
We begin with the basic setup of the location of the logging file. Notice the double slash for escaping and also keep in mind that we have to have a folder location on each and every machine that we will be using. We can name the folder location whatever we want and save it. Notice that all the setting go under the “Fabric Settings Option”.
Next, we want to stop that irritating part where the service keeps trying to upload data to Azure (telemetry service) and where the it keeps checking to see if the version of Service Fabric can be upgraded. Both of these services can occupy a ton of memory and waste resources on your on-premise development machines. It’s important to disable the Orchestrator service if you want to utilize this hack for saving resources in non-prod environments.
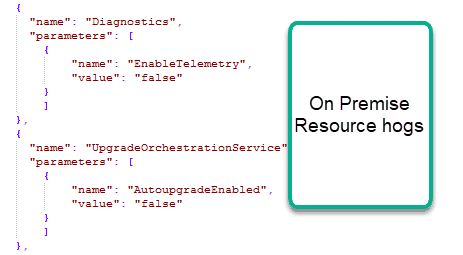
HACK 1: The upgrade service doesn’t support multiple nodes on multiple machines, so just turn it off and remember to upgrade yourself at some point.
Next, we stop the madness with running these services as a Network Service
Confession time: I cheated and made the account an admin on each of the local machines in my test environments but I wouldn’t do this in a real test environment and never in a production environment. I would, however, use a domain account instead of a network service. You need to do one special step here: login as the user that you have here and add the certificates to the user’s personal certificate store. You need to add the certificate with the thumbprint that you listed earlier. You need to also make sure that certificate is listed in Certificate computers section. As stated, if you’ve read the posts in this series, you are an expert at doing this.

HACK 2: By using Service Fabric and understanding the parameters, we avoided bunches of drama with the network service later on. Now, we can do special things like integrate with external applications much easier and employ Kerberos more easily.
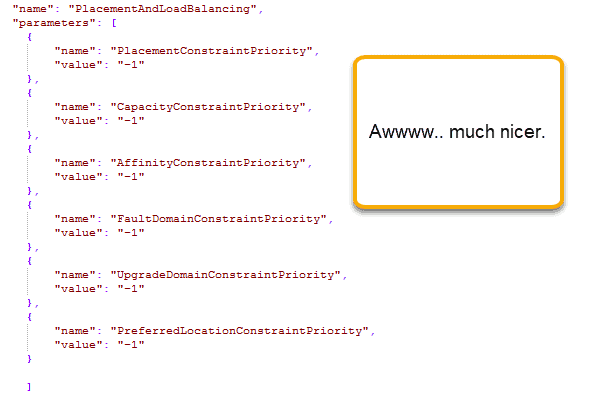
Next, take control of your system Ram and the clustering preferences by turning off the warnings for a non-performance testing environment
A major, major portion of resources is used with Service Fabric monitoring things like the preferred processors or preferred node or preferred upgrade domain and generating warnings based on best practice rules for running a data center. There are some seriously cool things we can do to alter performance and some seriously bad things that can happen here. While this is cool in our test environments, our main concern with AX isn’t in using it as a data center. Consequently, most people are of the opinion that you need to use some of the open source tools anyway as the onpremise and Azure versions of the data center management are a little too behind the market at the moment. These rules will flag the fact that you have multiple nodes per a machine on multiple machines and generate bunches of irritating warnings, even causing your service fabric to run your machines out of ram. It happened to me, I know. So, basically, with the understanding that load testing or disaster recovery is not our goal for this environment, simply turn that rule checking off. Just change the 6 values mentioned to -1.
Now, with those off, we can run with security and have our nodes on multiple machines. Furthermore, our machine even runs faster now because it doesn’t have to do all of that default rule checking. Try it yourself and see the radical difference in performance. Note: you should also understand that I mentioned a mere sample of the large amount of settings you can change to tune and spruce up your Service Fabric. My prediction is that performance troubleshooters will have to pay attention to this in Dynamics 365 just like everywhere else if they want implementations to run well.
HACK 3: We adjusted the settings to allow the multiconfig Json to allow multiple nodes per a machine on multiple machines.
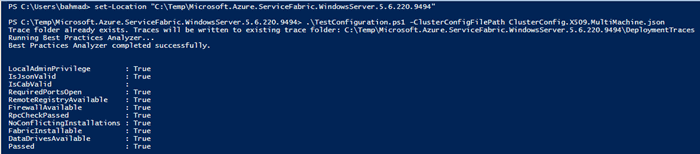
Seventh, when you are all done, test it out to see if you get the prerequisites installed right
The prerequisite for getting your Dynamics 365 for Operations and Finance to go is that the install is done with the ClusterConfig.X509.Multimachine.Json file. If that validates, then you can proceed with your On premise install. What’s tripped everyone up until now is that this particular file requires one node per a machine. That’s why the Microsoft team released the Dynamics 365 for Operations and Finance with so many machines. But you know how it goes. Once something is released to the community, people will figure out ways to improve it. As it turns out, I was able to get it to validate and run fine by changing these settings.
Make sure you run the test powershell script (you need to change the directory depending on where you saved it)
Set-location c:TempMicrosoft.Azure.ServiceFabric.WindowsServer.5.6.220.9494
.TestConfiguration.ps1 -ClusterConfigFilePath .ClusterConfig.X509.multimachine.json
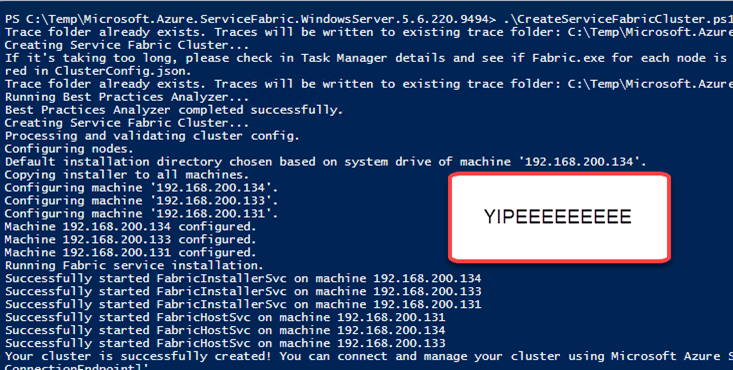
Eighth, now it is time for the install
Make sure you run the install powershell script (you need to change the directory depending on where you saved it)
Set-location c:TempMicrosoft.Azure.ServiceFabric.WindowsServer.5.6.220.9494
.CreateServiceFabricCluster.ps1 -ClusterConfigFilePath .ClusterConfig.X509.multimachine.json
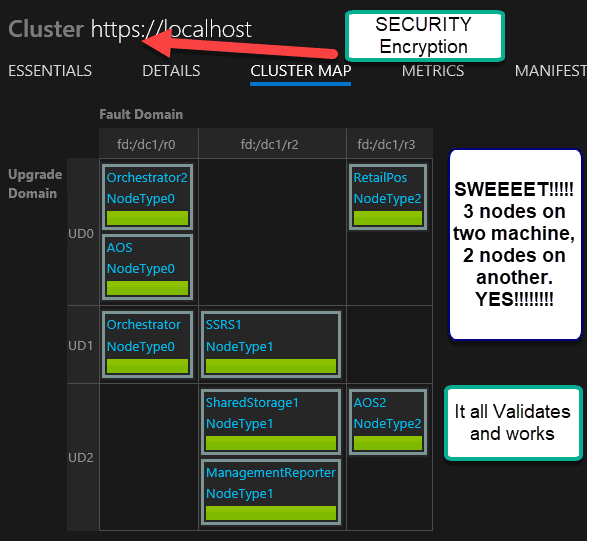
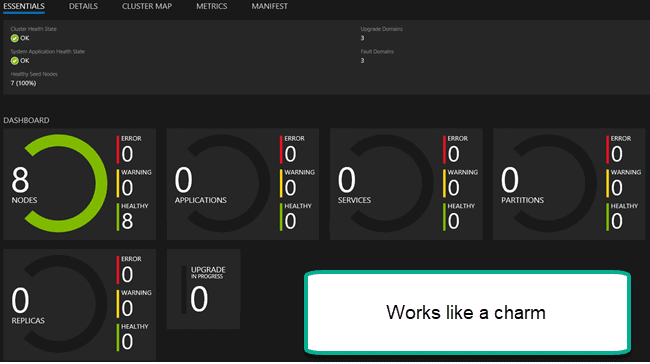
Ninth, see the chart and example here. Notice how we have a full blown data center map. You can see 3 nodes on the first server, 3 on the second, and 2 on the third, mapping to designated areas:
And here you can see even more loving..
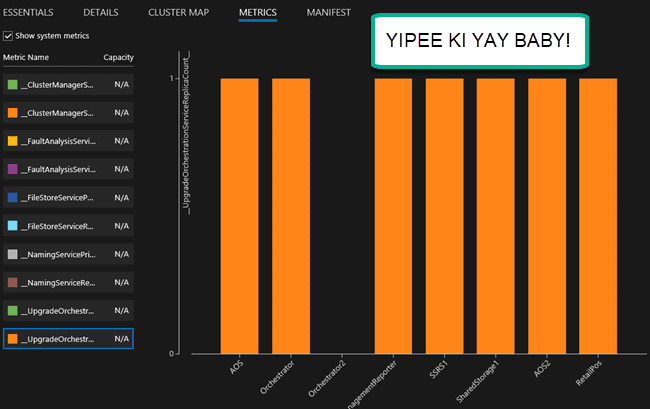
And our final piece of loving to take home for the road.
In Summary, we are now a quick step away from beginning the core Dynamics 365 on premise. We were able to significantly reduce the machines using open source tools, but I decided against it. I thought of a way to get it all down to one or two machines, but decided not to do it. Still, if you’ve read this long blog series so far, than your perseverance should start paying off. And we aren’t done yet. We have a quick couple of installs real fast and then we are ready for the main course. Fun.. Fun.. and more Fun!
Code for Copy and Paste Included below:
{
“name”: “BrandonAhmadCluster”,
“clusterConfigurationVersion”: “1.0.0”,
“apiVersion”: “04-2017”,
“nodes”: [
{
“nodeName”: “AOS”,
“iPAddress”: “192.168.200.1”,
“nodeTypeRef”: “NodeType0”,
“faultDomain”: “fd:/dc1/r0”,
“upgradeDomain”: “UD0”
},
{
“nodeName”: “Orchestrator”,
“iPAddress”: “192.168.200.3”,
“nodeTypeRef”: “NodeType0”,
“faultDomain”: “fd:/dc1/r0”,
“upgradeDomain”: “UD1”
},
{
“nodeName”: “Orchestrator2”,
“iPAddress”: “192.168.200.4”,
“nodeTypeRef”: “NodeType0”,
“faultDomain”: “fd:/dc1/r0”,
“upgradeDomain”: “UD0”
},
{
“nodeName”: “ManagementReporter”,
“iPAddress”: “192.168.200.1”,
“nodeTypeRef”: “NodeType1”,
“faultDomain”: “fd:/dc1/r2”,
“upgradeDomain”: “UD2”
},
{
“nodeName”: “SharedStorage1”,
“iPAddress”: “192.168.200.3”,
“nodeTypeRef”: “NodeType1”,
“faultDomain”: “fd:/dc1/r2”,
“upgradeDomain”: “UD2”
},
{
“nodeName”: “SSRS1”,
“iPAddress”: “192.168.200.4”,
“nodeTypeRef”: “NodeType1”,
“faultDomain”: “fd:/dc1/r2”,
“upgradeDomain”: “UD1”
},
{
“nodeName”: “RetailPos”,
“iPAddress”: “192.168.200.1”,
“nodeTypeRef”: “NodeType2”,
“faultDomain”: “fd:/dc1/r3”,
“upgradeDomain”: “UD0”
},
{
“nodeName”: “AOS2”,
“iPAddress”: “192.168.200.3”,
“nodeTypeRef”: “NodeType2”,
“faultDomain”: “fd:/dc1/r3”,
“upgradeDomain”: “UD2”
}
],
“properties”: {
“diagnosticsStore”:
{
“metadata”: “Please replace the diagnostics file share with an actual file share accessible from all cluster machines.”,
“dataDeletionAgeInDays”: “7”,
“storeType”: “FileShare”,
“connectionstring”: “c:\ProgramData\SF\DiagnosticsStore”
},
“security”: {
“metadata”: “The Credential type X509 indicates this is cluster is secured using X509 Certificates. The thumbprint format is – d5 ec 42 3b 79 cb e5 07 fd 83 59 3c 56 b9 d5 31 24 25 42 64.”,
“ClusterCredentialType”: “X509”,
“ServerCredentialType”: “X509”,
“CertificateInformation”: {
“ClusterCertificate”: {
“Thumbprint”: “da5251ae15b04c977645850974f2625bc46da39g”,
“ThumbprintSecondary”: “da5251ae15b04c977645850974f2625bc46da39g”,
“X509StoreName”: “My”
},
“ServerCertificate”: {
“Thumbprint”: “da5251ae15b04c977645850974f2625bc46da39g”,
“ThumbprintSecondary”: “da5251ae15b04c977645850974f2625bc46da39g”,
“X509StoreName”: “My”
},
“ClientCertificateThumbprints”: [
{
“CertificateThumbprint”: “da5251ae15b04c977645850974f2625bc46da39g”,
“IsAdmin”: false
},
{
“CertificateThumbprint”: “da5251ae15b04c977645850974f2625bc46da39g”,
“IsAdmin”: true
}
],
“ClientCertificateCommonNames”: [
{
“CertificateCommonName”: “da5251ae15b04c977645850974f2625bc46da39g”,
“CertificateIssuerThumbprint”: “da5251ae15b04c977645850974f2625bc46da39g”,
“IsAdmin”: true
}
],
“ReverseProxyCertificate”: {
“Thumbprint”: “da5251ae15b04c977645850974f2625bc46da39g”,
“ThumbprintSecondary”: “da5251ae15b04c977645850974f2625bc46da39g”,
“X509StoreName”: “My”
}
}
},
“nodeTypes”: [
{
“name”: “NodeType0”,
“clientConnectionEndpointPort”: “19000”,
“clusterConnectionEndpointPort”: “19001”,
“leaseDriverEndpointPort”: “19002”,
“serviceConnectionEndpointPort”: “19003”,
“httpGatewayEndpointPort”: “19080”,
“reverseProxyEndpointPort”: “19081”,
“applicationPorts”: {
“startPort”: “20001”,
“endPort”: “20031”
},
“isPrimary”: true
},
{
“name”: “NodeType1”,
“clientConnectionEndpointPort”: “19008”,
“clusterConnectionEndpointPort”: “19009”,
“leaseDriverEndpointPort”: “19010”,
“serviceConnectionEndpointPort”: “19011”,
“httpGatewayEndpointPort”: “19084”,
“reverseProxyEndpointPort”: “19085”,
“applicationPorts”: {
“startPort”: “20575”,
“endPort”: “20605”
},
“isPrimary”: false
},
{
“name”: “NodeType2”,
“clientConnectionEndpointPort”: “19012”,
“clusterConnectionEndpointPort”: “19013”,
“leaseDriverEndpointPort”: “19014”,
“serviceConnectionEndpointPort”: “19015”,
“httpGatewayEndpointPort”: “19086”,
“reverseProxyEndpointPort”: “19087”,
“applicationPorts”: {
“startPort”: “20862”,
“endPort”: “20892”
},
“isPrimary”: false
}
],
“fabricSettings”: [
{
“name”: “Setup”,
“parameters”: [
{
“name”: “FabricDataRoot”,
“value”: “C:\ProgramData\SF”
},
{
“name”: “FabricLogRoot”,
“value”: “C:\ProgramData\SF\Log”
}
]
},
{
“name”: “Diagnostics”,
“parameters”: [
{
“name”: “EnableTelemetry”,
“value”: “false”
}
]
},
{
“name”: “UpgradeOrchestrationService”,
“parameters”: [
{
“name”: “AutoupgradeEnabled”,
“value”: “false”
}
]
},
{
“name”: “RunAs”,
“parameters”: [
{
“name”: “RunAsAccountName”,
“value”: “instructorbrandon@brandonahmadlabs.com”
},
{
“name”: “RunAsAccountType”,
“value”: “DomainUser”
},
{
“name”: “RunAsPassword”,
“value”: “password1”
}
]
},
{
“name”: “RunAs_Fabric”,
“parameters”: [
{
“name”: “RunAsAccountName”,
“value”: “instructorbrandon@brandonahmadlabs.com”
},
{
“name”: “RunAsAccountType”,
“value”: “DomainUser”
},
{
“name”: “RunAsPassword”,
“value”: “password1”
}
]
},
{
“name”: “RunAs_DCA”,
“parameters”: [
{
“name”: “RunAsAccountName”,
“value”: “instructorbrandon@brandonahmadlabs.com”
},
{
“name”: “RunAsAccountType”,
“value”: “DomainUser”
},
{
“name”: “RunAsPassword”,
“value”: “password1”
}
]
},
{
“name”: “RunAs_DCA”,
“parameters”: [
{
“name”: “RunAsAccountName”,
“value”: “instructorbrandon@brandonahmadlabs.com”
},
{
“name”: “RunAsAccountType”,
“value”: “DomainUser”
},
{
“name”: “RunAsPassword”,
“value”: “password1”
}
]
},
{
“name”: “PlacementAndLoadBalancing”,
“parameters”: [
{
“name”: “PlacementConstraintPriority”,
“value”: “-1”
},
{
“name”: “CapacityConstraintPriority”,
“value”: “-1”
},
{
“name”: “AffinityConstraintPriority”,
“value”: “-1”
},
{
“name”: “FaultDomainConstraintPriority”,
“value”: “-1”
},
{
“name”: “UpgradeDomainConstraintPriority”,
“value”: “-1”
},
{
“name”: “PreferredLocationConstraintPriority”,
“value”: “-1”
}
]
}
]
}
}
