Consulting, Microsoft Dynamics AX
The Unofficial AX Architects Guide to Integrating Dynamics AX Reporting with SharePoint Part 2 of 4
You’ve probably noticed in this series that we are installing more than just the reporting extensions. Silo BI AX setups are the enemy. They limit our ability to effectively use the latest ease of use technologies and cause people to walk away with a bad, mistaken view of AX Business Intelligence. I’ve walked on many an implementation and had to prove just what AX is capable of doing because it is such a rich repository of information. Yes, we will install the proprietary AX reporting extensions, but our goal is to be able to utilize and tie SharePoint into our complete AX business intelligence infrastructure so that they go hand and hand. Again, please pay attention to the AX tips that I give you as many of them are undocumented as of today, but I’ve found them to be absolutely necessary for my success with getting these to work. .
Let’s Start…
The biggest thing with the powerpivot installation is just to follow the documentation online. What I will do is list the few small differences with the documentation to get our site ready for some Dynamics AX functionality. Most of it is just a standard installation and nothing else. One note, notice here that I don’t enable an extra SQL Server Database Relational Engine. That can be your call, but I usually don’t need another instance unless the SharePoint databases are also on that instance.
First, run the setup from the SQL Server CD on the database server that will be hosting PowerPivot
Here is a current link, but it will probably change in the future:
PowerPivot for SharePoint 2013 Installation
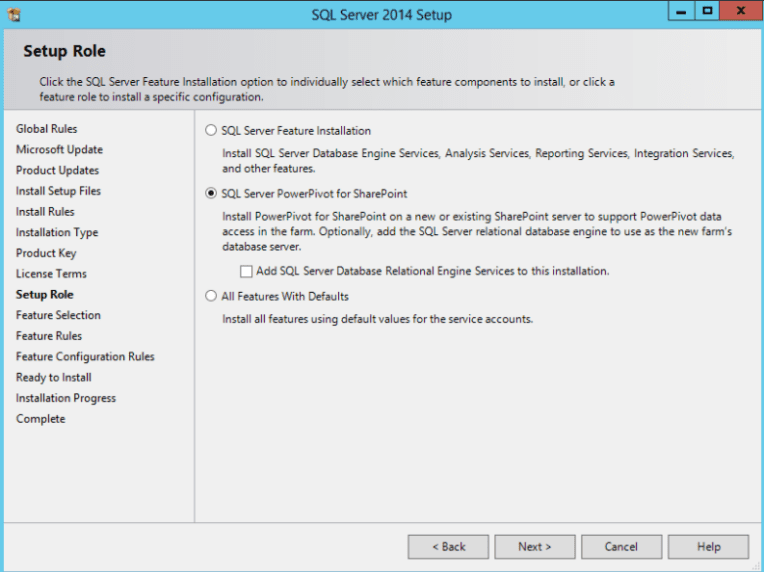
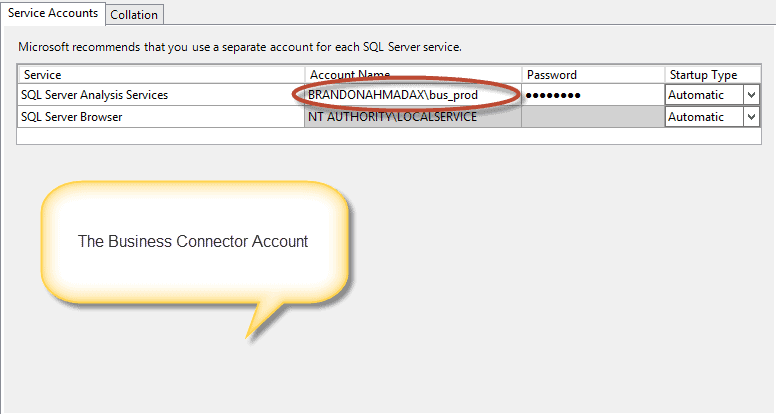
Second, set the appropriate accounts
Notice here, how I use the bus_prod for my Dynamics AX PowerPivot instance. This is not required, but from experience, I can tell you that it makes things way easier later on.
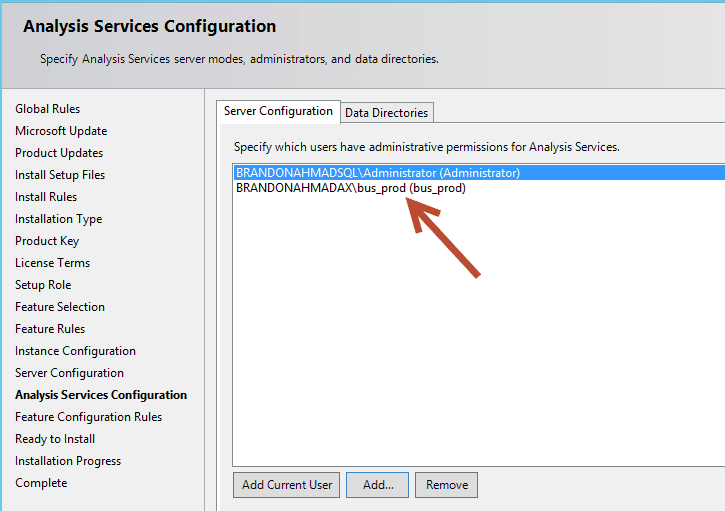
Third, add the appropriate Dynamics AX account or accounts to the administrators goup
To save myself headaches later on, I also add the bus_prod account to the powerpivot instance administrator’s account. Again, this is not required but will save you a lot of troubleshooting later on. I’ve gone back and forth on this one between the security versus the troubleshooting time to get all those accounts working. On one hand, a good password goes a long way, but having this many services running under one account is not a good password. On the other hand, you try to eliminate security when you are troubleshooting an implementation to get it working first. There are so many different layers to AX working, and anything can be broken. Currently, I feel that a successful strategy always centers on first verifying a base install and getting things working. What I would recommend is to first get the AX reporting working with simple permissions and then begin customizing the services and service accounts as the accounts they run under can have widely varying requirements based upon existing security infrastructure.
Fourth, make sure that the Secure Store Service is up and running. Configure Excel Services to use it
[My own undocumented workarounds from having had to fix many SharePoint/Dynamics AX broken implemenations]
Now, it is absolutely critical that you use the Secure Store Service to fully experience the goodies of Modern BI and Dynamics AX. Go to the Service Applications option within Central Administration and click Manage on the Secure Store Service application.
Once, inside of the Manage option and then make a new Target Application. In order for Excel Services and PowerView to work correctly, this is where you would typically setup the right account. What you are doing is telling the service to use a special account when requesting data access.
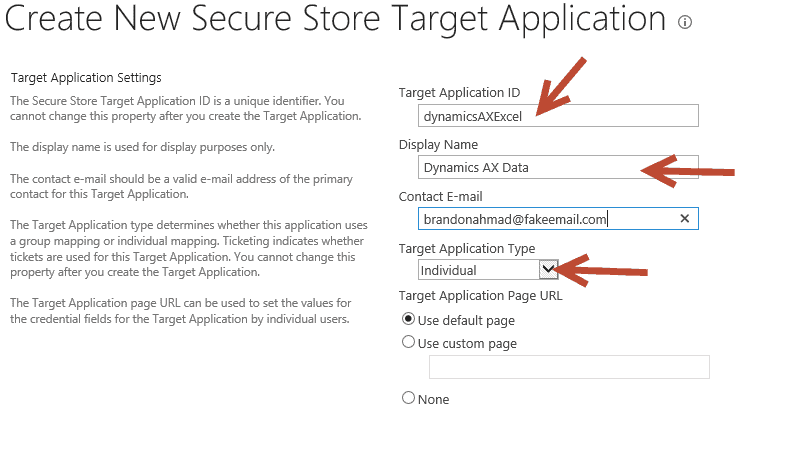
Now, make sure that you use a username and password which will have permissions to access Dynamics AX data.

Notice that what you end up with is a new target application, which is really just a name that you have given to a username and password that Excel Service will use when it goes out to retrieve Dynamics AX data. In this case, this is the business connector account:

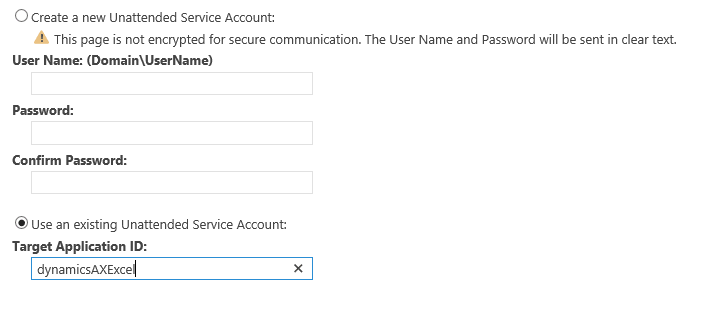
Now, go back to Service Applications. Click on the Excel Services Application and click Manage. Go to the Target Application ID and enter dynamicsAXExcel into the Target Application ID.
Fifth, Open up the ports for PowerPivot
Now, don’t forget to go to SQL and open up the Analysis Services Ports.
http://msdn.microsoft.com/en-us/library/ms174937.aspx
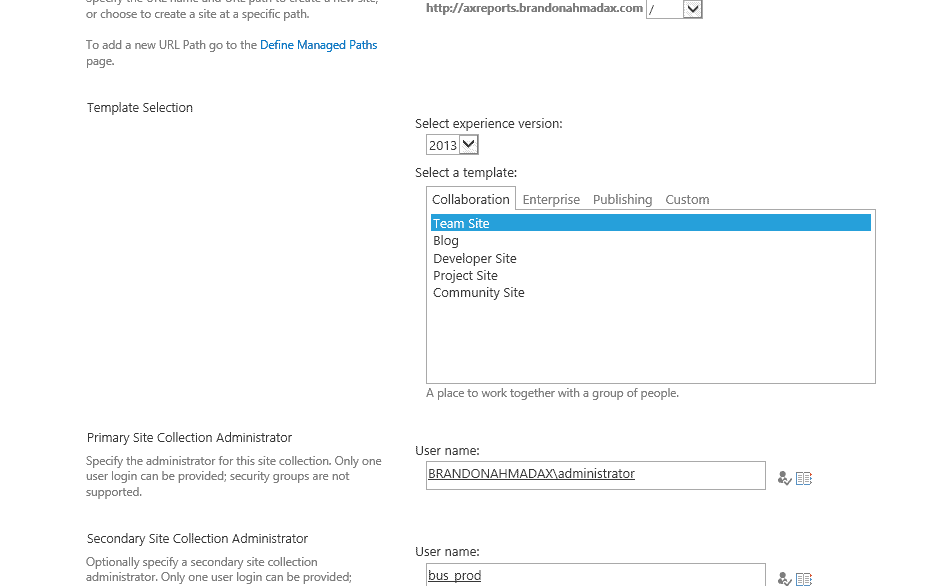
Sixth, Create a SharePoint Team Foundation Server basic site.
Yuuup.. That’s right. To enable AX reporting when in SharePoint integrated mode, you need to create a basic SharePoint 2013 site Collection from Central Administration. Make sure that you and the business connector are administrators.
7th, Run the SharePoint PowerPivot Configuration tool on each and every SharePoint server where you will be hosting Dynamics AX reporting
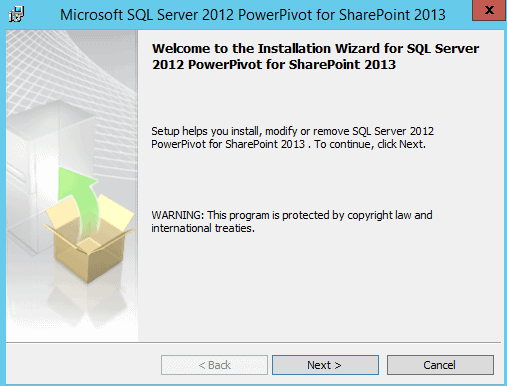
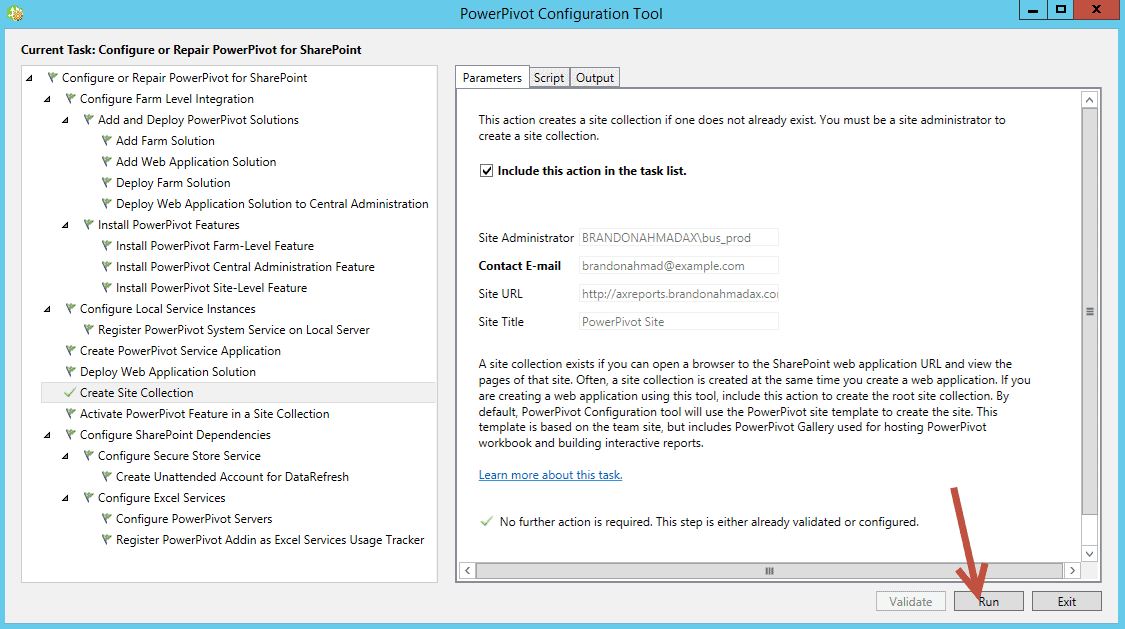
From the SharePoint Server, make sure that you run the spPowerPivot tool that you can download. For SQL 2014, as of now (08/16/2014), you must use the PowerPivot for SQL 2012 SP1 and SharePoint 2013. Make sure that you run this tool from each and every SharePoint server in the farm. Once again, I’ll leave the installation to the documentation as there is nothing special about Dynamics AX here. You could just keep clicking next if you are happy with that.
Now, when I run the validate(the little green flags and check marks symbolize that on the left), notice that everything goes through just fine.
GOT AN ERROR BUT IT IS EASY TO FIX
Interestingly enough, I had not run into the “cannot create unattended account for data refresh” error until this install on my virtual machine. And I’ve installed reporting on a few implementations. But in the end, it turned out
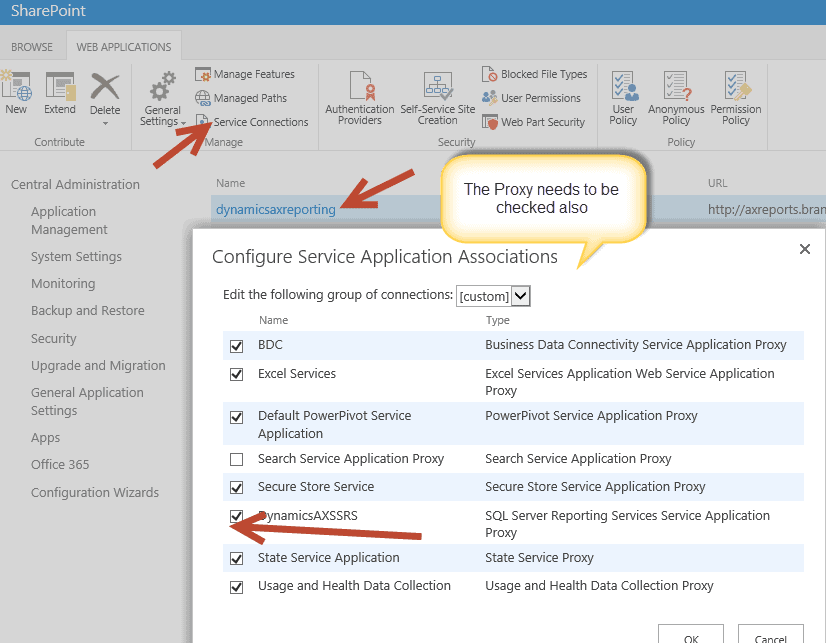
To just be an error on my part where I forgot to check the Service Connection (shown in a picture below).
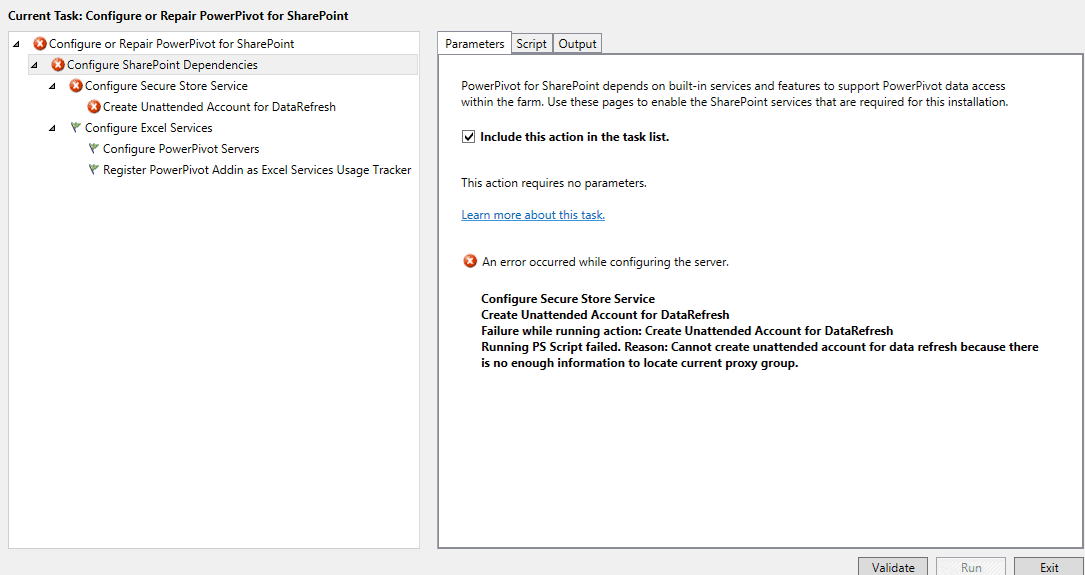
Now, once the install runs, you may run into this error in SQL Server 2014 with Windows Server 2012R2. That’s okay, you can either manually create the data refresh account or simply go to the screen:
Should you get that error 2 options:
Option 1:
Just go back to Service Connections in the Web Applications Screen of Central Administration. Make sure that the powerpivot application is checked.
FIX 2 JUST IN CASE YOU GET THE SAME ERROR FOR A DIFFERENT REASON
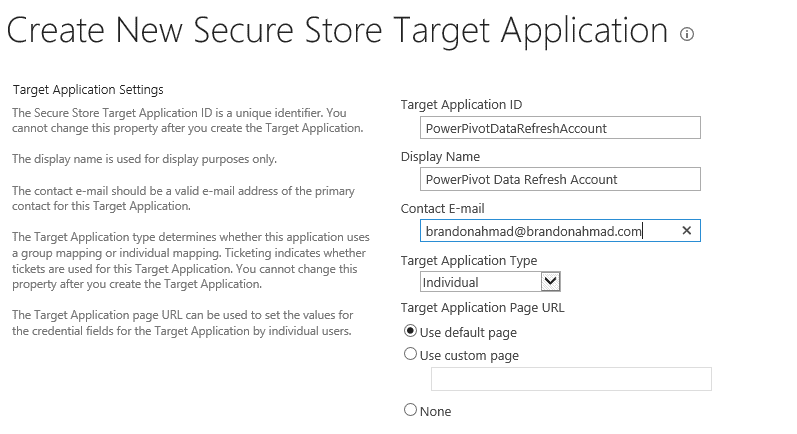
At a high level, go back to the Secure Store Service Application like you did for Excel Services and create a new Target Application:
And here is the extra account as the workaround.

Finally, now, we simply go back to the Manage Service Applications and choose Manage on the Default PowerPivot Service Application

Now, click on Actions and click on Configure Service Application settings

And simply map the account you created in the secure store service as the new PowerPivot Unattended Data Refresh Account

All fixed.
Finally, don’t forget to go back later and set contribute permissions for the Business Connector account or whatever account you choose to run as the data refresh account in the Secure Store settings under ‘Manage’ in the Service Applications page of the Central Administration console.
I’ll leave that step to the documentation. But at this point, you have now installed PowerPivot correctly. You’ll simply need to do a few small configurations when you download your first workbook included in the links below.
http://msdn.microsoft.com/en-us/library/ff773327.aspx
FINALLY,
So, what did you learn? You installed PowerPivot, but you did it in an AX friendly way because PowerPivot is the real deal and has become an essential part of a BI application. That was a big Part 2, but you are getting a lot closer. Now, you have some awesome PowerPivot data just waiting for AX, and you are doing it right. You are learning AX specific parts of setting up a SharePoint infrastructure like how to configure SharePoint managed accounts to work with AX or appropriately segment we applications. But we need to take the next step. We need to enable PowerView to get even more SharePoint goodies and create impressive dashboards for our clients. Then, it is time to get those Proprietary AX Extensions working also (in Part 4) so that we have a full SharePoint Integrated Infrastructure. Stay tune because we are just getting started.

 12244
12244 