Data Model Series, Dynamics 365 Tutorials
Techno-Functional Dynamics 365 F&S Data Model Explanations for Reporting, Part 8 of 25-Picking List Creation for Sales Order
Things have changed a lot since I started blogging over a decade ago. There are so many wonderful topics to blog and learn on today; it seems like one doesn’t even know where to start. To make the process more friendly, I’ve introduced a new sort of techno-functional blog tutorial. In this series, some very talented developers from my team have contributed their expertise to assist with this content approach to ensure that we keep our quality and quantity high. I hope you all sincerely enjoy the new approaches that we’ve innovated.. And as always, don’t hesitate to reach out to me.. I’m always here to help. — Brandon Ahmad
Dynamics 365 Sales Order: Item Picked and Picking List
In the previous post of this series, you learned to create and confirm the sales order. In this blog post, we will walk you through another process of the sales order that is Dynamics 365 picking list creation of the items picked from the warehouse. And by reading this post, you will understand the functional and technical process behind choosing these items.
Once the order has been confirmed, you will need to ship the items to customers. The most significant parts of this process are to pick the items from the warehouse and complete the necessary arrangements for their delivery. Let’s begin with picking the items. The first option is to use the picking form to manually pick items for the sales order. This process is exactly like the purchase order registration process. The second option requires the user to have the two-step picking method enabled. Once enabled, you can pick the items through the picking list registration.
Now let’s perform the function.
Dynamics 365 Picking List Creation for Sales Order: Functional Walkthrough

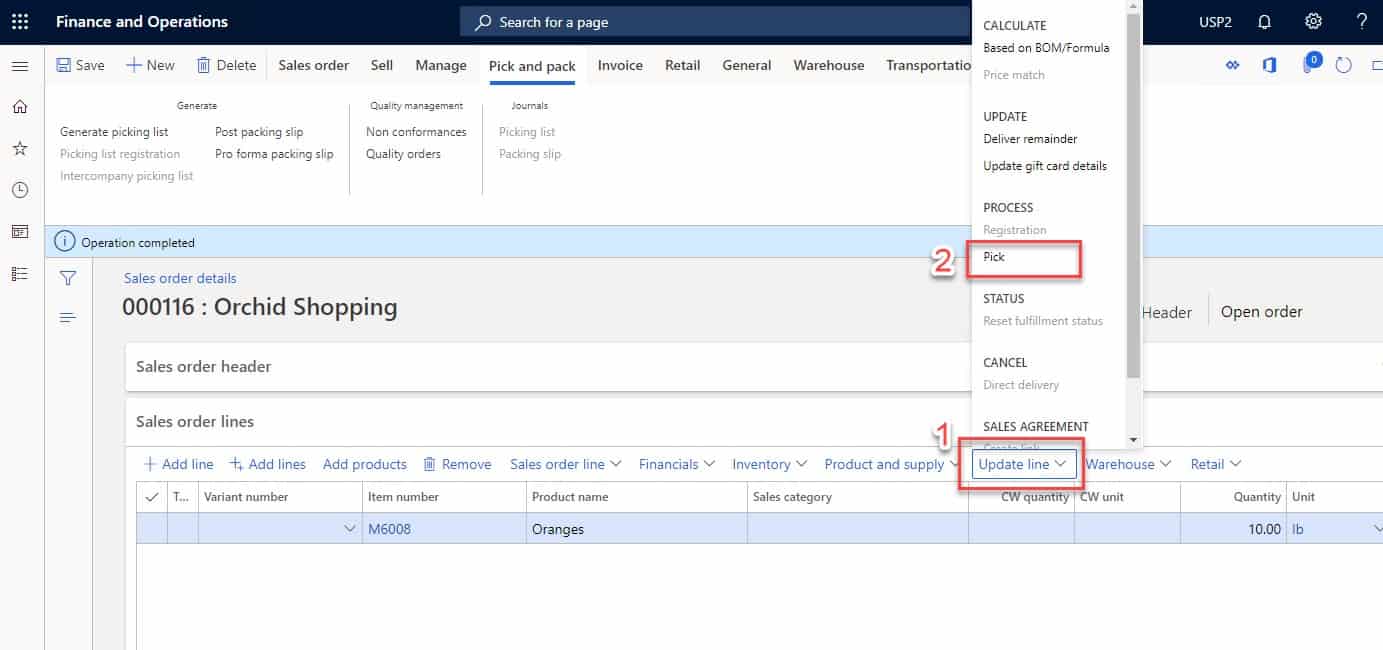
- First, open the Sales Order and click on Update line/Pick in the toolbar of the order line.
- Once you are in the pick section, you will use the lower picking lines pane to insert lines. There are two options for this step as well. The first option is to use the +Add picking line button in the toolbar in the upper pane. The second option is to manually enter records through the +Add button in the lower pane.
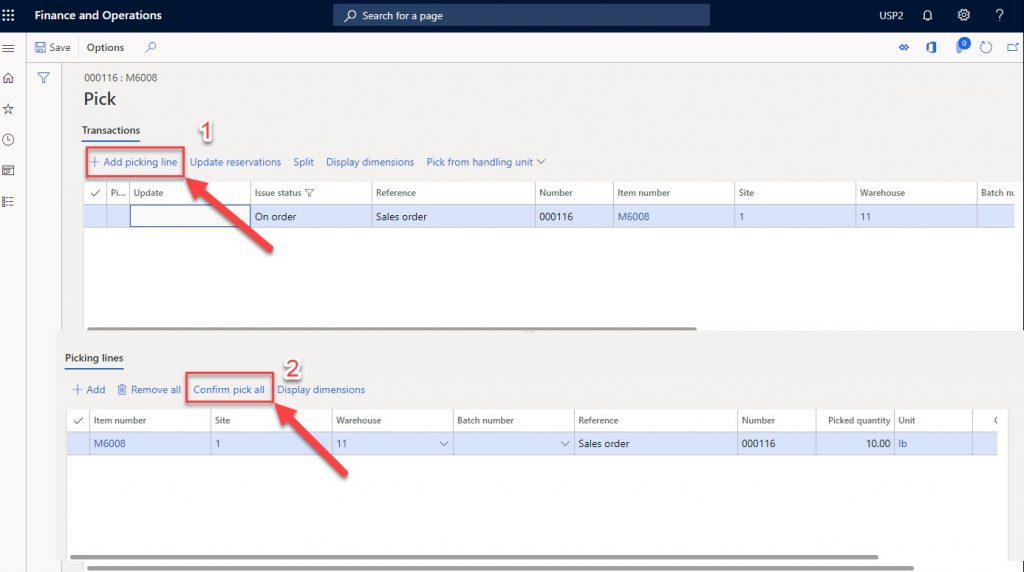
- It is always a good idea to practice both methods, even if you end up favoring one over the other. Moving on. Now that you have completed the previous steps, you need to create the Generate Picking List. In order to do this, click on the ‘Pick and pack’ tab. From there, you will click on “PickingList”.

- Take a moment and process what you have done so far. Once you are comfortable completing these steps, move on. The next course of action is to check the details of the sales order lines. You will do this by clicking on “Line” and then “OK”.
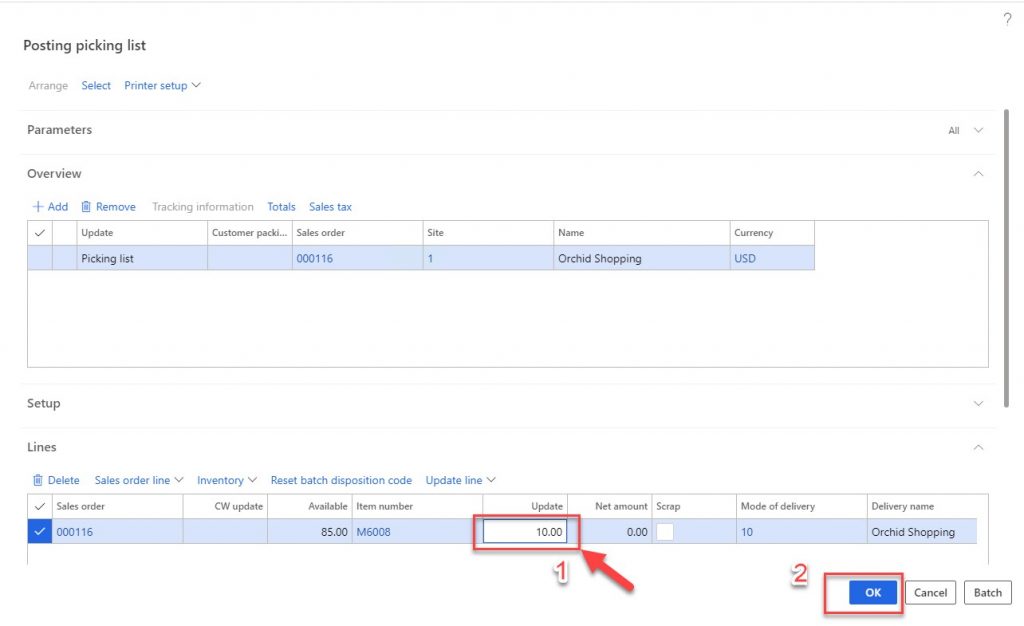
- If the Picking list receipt is enabled, you will see the Posted Picking list receipt beneath the ‘Pick and pack’ tab under the journals.

Dynamics 365 Picking List Creation for Sales Order: Technical Walkthrough
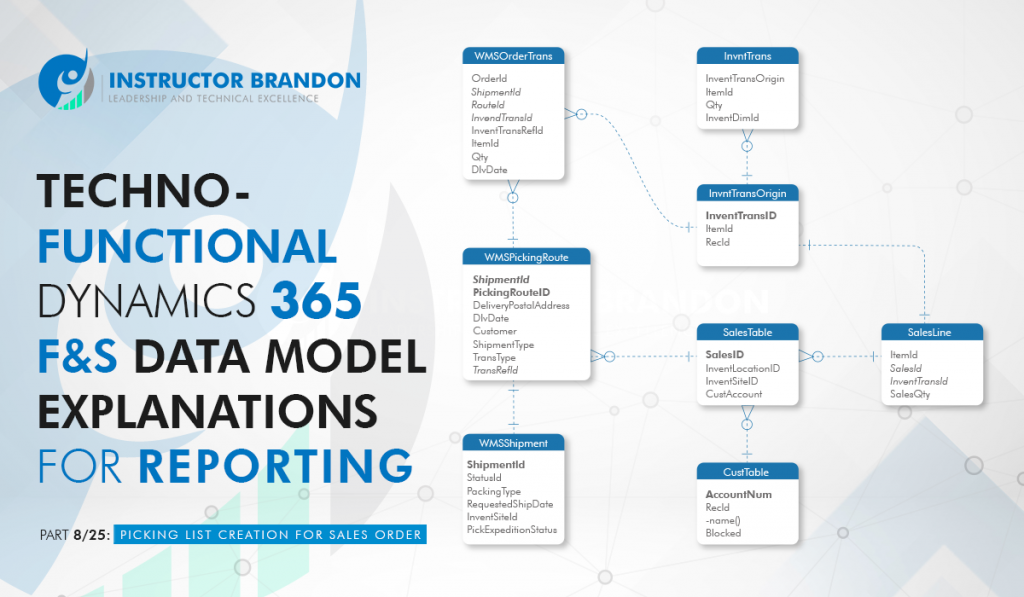
We have covered the functional part of picking the items and generating the picking list receipt of the sales order. Now it’s time to work through the technical recap of this process. There are four primary tables involve: “WMSPickingListRoute”, “WMSPickingListRouteLink”, “WMSOrderTrans”, and “WMSShipment”.
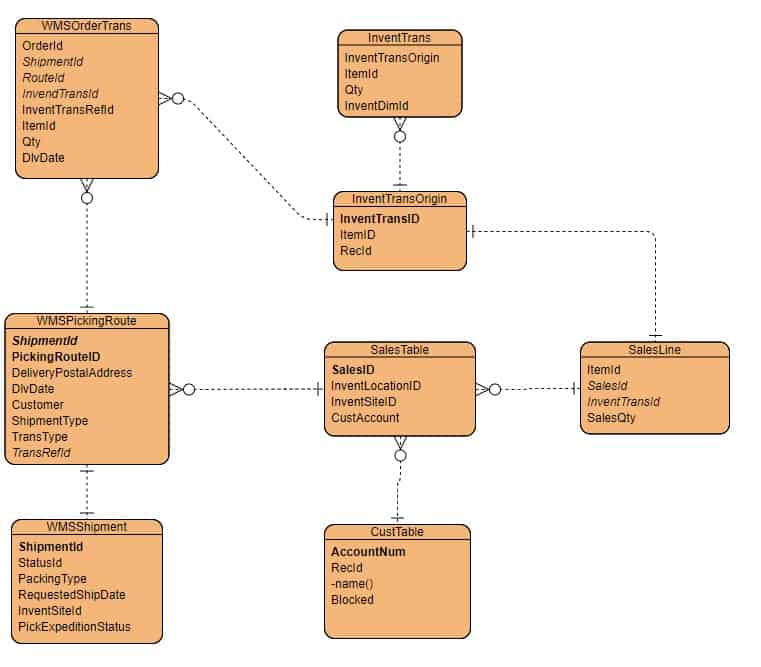
Entity Relationship Diagram (ERD) for Dynamics 365 Picking List Creation for Sales Order
The Entity Relationship Diagram (ERD) will give a more thorough understanding of the functionality of the picking items process. The ERD shows all the cardinality constraints relationships among the tables. Now let’s see what that looks like:
Below you will see a Runnable Class (job)
[sourcecode language=”c-sharp”] class ibCreateSOPickingList{
/// <summary>
/// Runs the class with the specified arguments.
/// </summary>
/// <param name = "_args">The specified arguments.</param>
public static void main(Args _args)
{
SalesFormLetter_PickingList salesFormLetter;
SalesTable salesTable = salesTable::find(‘001011’); // replace ‘001011’ your sales order number
salesFormLetter = SalesFormLetter_PickingList::newPickingList();
salesFormLetter.transDate(systemDateGet());
salesFormLetter.update(salesTable,
systemdateget(),
SalesUpdate::All,
AccountOrder::None,
NoYes::No,
NoYes::No);
}
}
[/sourcecode]
WMSPickingListRoute
The WMSPickinglistRoute table contains information concerning the picking routes, which are used in warehouse management systems to control the picking process.
| Fields | Data Type | Description |
| ShipmentId | String | This field contains ShipmentId details for warehouse management. |
| ParmId | String | This field contains ParmId of sales orders. |
| LogisticsPostalAddressId | String | This field contains information about LogisticPostalAddressid. |
| PickingAreaRoteId | String | This field contains information about pickingAreaId of sales orders. |
| DlvDate | Date | This field contains the information about delivery date. |
| Customer | String | This field contains information about customers. |
| ShipmentType | Enum | This field contains information about shipment types. |
WMSOrderTrans
The WMSOrderTrans table stores information from the sales order transaction line details, and it is used for item picking, shipping, and pallet transportation.
| Fields | Data Type | Description |
| OrderId | String | Information about sales order id. |
| ShipmentId | String | Shipment id information for the warehouse management system. |
| RouteId | String | Route id for the warehouse management system. |
| InvendTransId | String | This field stores the Inventory Transaction id. |
| InvendtransRefId | String | Inventory Transfer id. |
| ItemId | String | Information about the Item id. |
| Qty | Real | Information about the quantity. |
| ItemTagging | Enum | Item tagging details. |
WMSShipment
WMSShipment table helps to track all the inbound and outbound shipment details by using shipment id. You can originate a shipment by using any of the three types of order i.e. sales order, transfer order, or production order. Also, this table not only stores the expected shipment details along with shipment addresses but also contains details of license plates and inventory warehouse.
| Fields | Data Type | Description |
| ShipmentId | String | Shipment id information for warehouse management system. |
| StatusId | String | The status of the picking route. |
| PackingType | Enum | Information about packing type (i.e) all, same customer, and order. |
| RequestedShipDate | Date | Information about requested ship dates for warehouse management system. |
| InventSiteId | String | The Invent Site id. |
| PickExpeditionStatus | Enum | The status of pickExpedition (i.e) completed. |
INVENTTRANSORIGIN
This is the master table for the inventory transaction data we just have created. Below we have explained some major columns of this table.
| Fields | Data Type | Description |
| InventTransId | string | The unique identifier that corresponds to the order line item column of the same name. |
| ItemId | string | The unique identifier for the inventory item |
| Party | int64 | The Party id that corresponds to the vendor. |
INVENTTRANS
This is the detailed table of InventTransOrigin with a record of every inventory transaction against the line item referenced by InventTransID. This table can get us every detail of the inventory transaction such as Quantity, Invoice ID, Project ID, and Item ID. In the table below, we have mentioned some important columns along with their descriptions.
| Field | Data Type | Description |
| ItemId | string | The inventory item id of the item is repeated. |
| InvoiceId | string | Link to invoice data. |
| Qty | int | The inventory quantity transacted. |
| Voucher | string | Link to ledger voucher data. |
| Dateinvent | DateTime | Date of the inventory transaction. |
| DateFinancial | DateTime | Date of a financial post of inventory transaction. |
| InventDimId | string | Company code. |
| InventTransOrigin | Int64 | The RecId value of relevant records that exist in InventTransOrigin table. |
CUSTTABLE
CustTable contains information about the customers for account receivable and Sales & Marketing in Dynamics 365. There are options to setup payment methods other than cash i.e. Check, Credit card, Postdated check, etc, and this setup is maintained in CustTable. Let’s have a look at some important columns below with their descriptions.
| Fields | Data Type | Description |
| AccountNum | string | The information about customer account number. |
| Blocked | Enum | Blocked information. |
| InvoiceAccount | string | Invoice account on which invoice will be posted. |
| InventSiteId | string | Site for the sales order. |
| InventLocation | string | Warehouse for the sales order. |
Summary
In this blog post, we have discussed the picking list creation process in Dynamics 365. The detailed steps mentioned above will help you master a very important process of the sales order that is picking items. You can pick items in two ways, either by doing it manually or through posting the pickinglist. This information and training aim to develop a deeper understanding of the functional and technical parts of the picking process. Knowing these differences will help you understand how the system should work and what the system should do. In the next part of this blog post series, you will learn how to post the packing slip in Dynamics 365, as it is the most important part before invoicing. The good news is that the next part is quite similar to what we have done previously, so you should be able to pick it up fairly quickly.

 24510
24510 