Data Model Series, Dynamics 365 Tutorials
Techno-Functional Dynamics 365 F&S Data Model Tutorial Part 17 of 25 – Configure Link Products Process
Configure Link Products D365 Techno-Functional Tutorial 17
In this Techno-Functional Tutorial 17 by Instructor Brandon, you learn how to Configure Link Products in Dynamics 365 as a great selling tool.
“It has been a long and fruitful journey regarding these blog post series! D365 is big domain to have more than 25 business processes, that’s for sure, we will continue describing the functional steps, table structures and code samples for the most important ones. Now we will talk about the Linked Products, a useful feature for selling related items to customers in the POS (Point of Sale) of your brick and mortar store or your online commerce. I hope you enjoy this post as much as the rest of the series. We are here to help you with your Dynamics 365 implementation, please reach us anytime”. — Brandon A.
Today, we are going to look at one of the most important processes in Dynamics 365 F&S. This Blog post walks us through how to Configure Link Products in Microsoft Dynamics 365. Linked products allow to offer additional products when a customer is buying an item – this is valid for Dynamics 365 Commerce (previously called Dynamics 365 Retail). This tutorial uses demo data and assumes both products have already been created and released inside Dynamics 365 F&S.
How to Configure Link Products Process Manually: Dynamics 365 F&S Functional Walk-through
Step 1: Product Information Management
Go to Product information management > Products > Released products
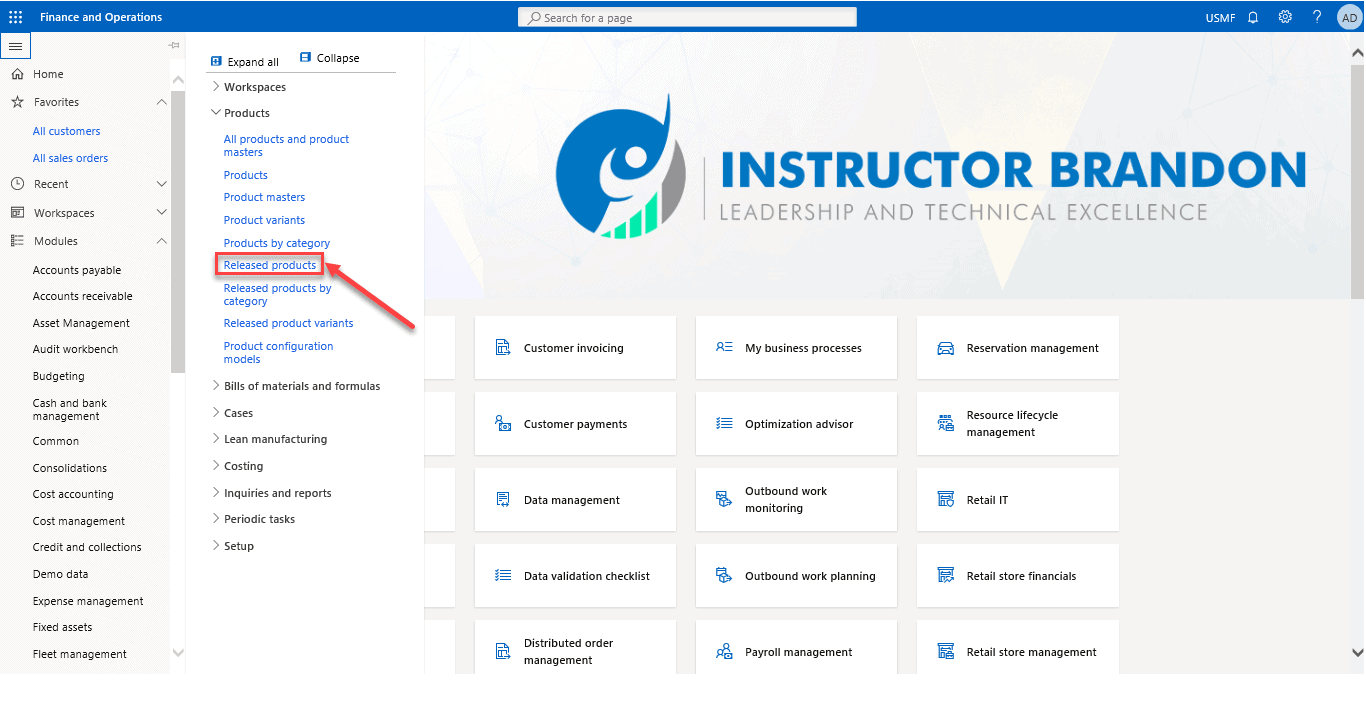
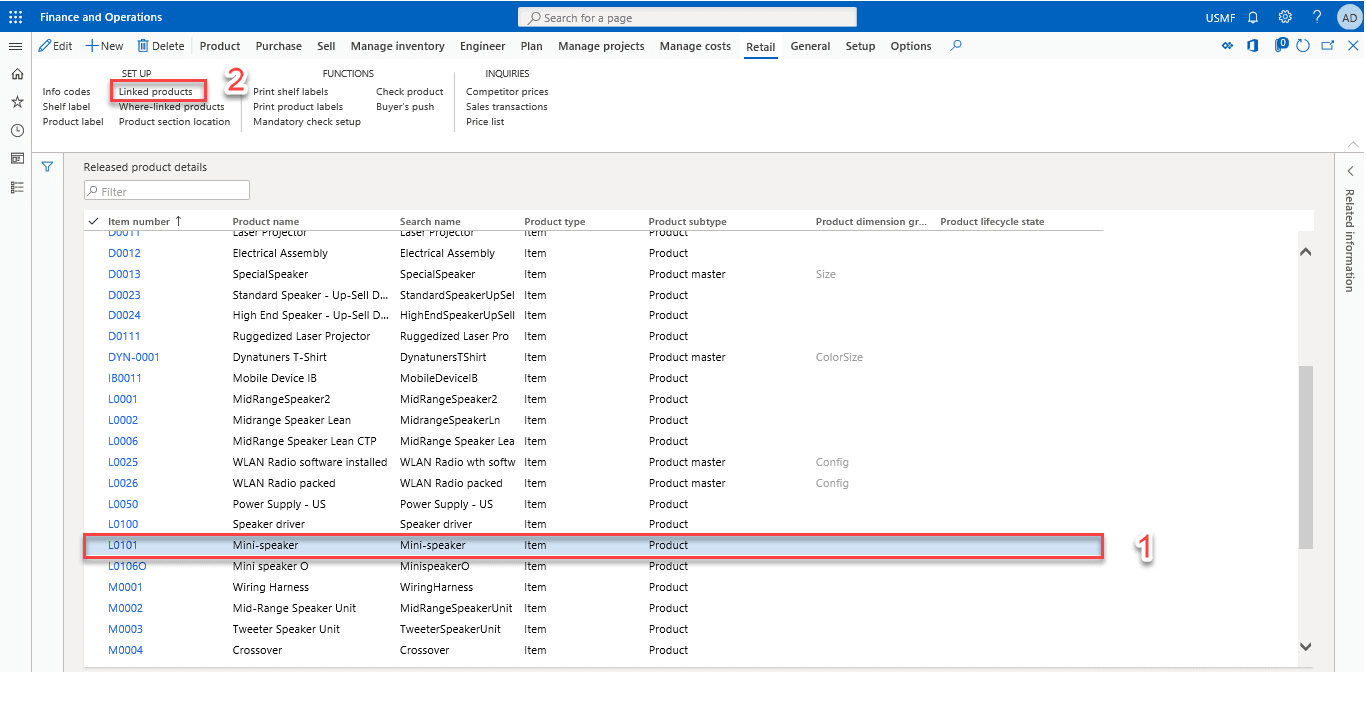
Step 2: Click Linked Products
In the list, find and select the desired record. On the Action Pane, click Retail/Commerce tab. Click Linked products.

Looking for Microsoft Dynamics 365 Training Courses, Instructor Brandon can help you in this as we have the most advanced Dynamics 365 Training Courses from Microsoft along with Top Level Certifications which can add real-time value and enhance your career as a professional in IT World.
Moreover, you can also read about Microsoft courses and Dynamics 365 certifications with every possible detailed information provided.
Step 3: Configure Link Products Process
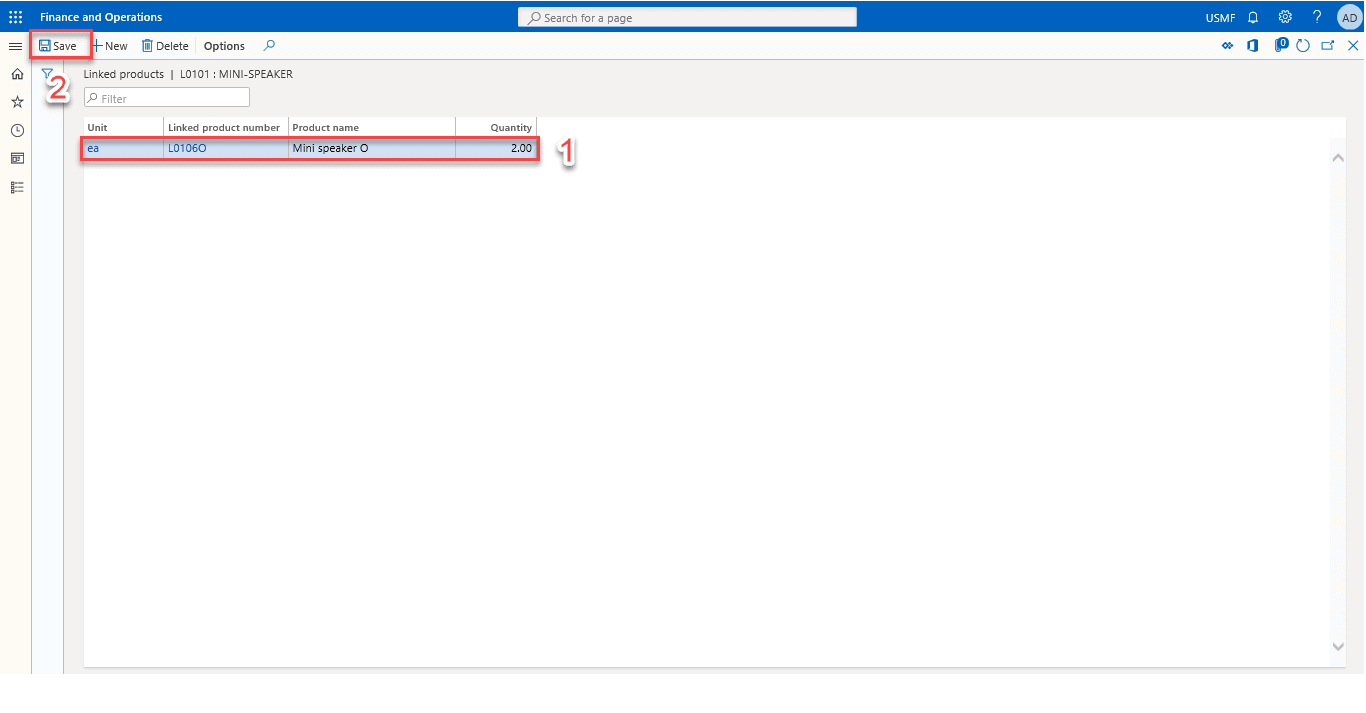
Linked Product form will be opened. Click on Edit to input information in the fields.
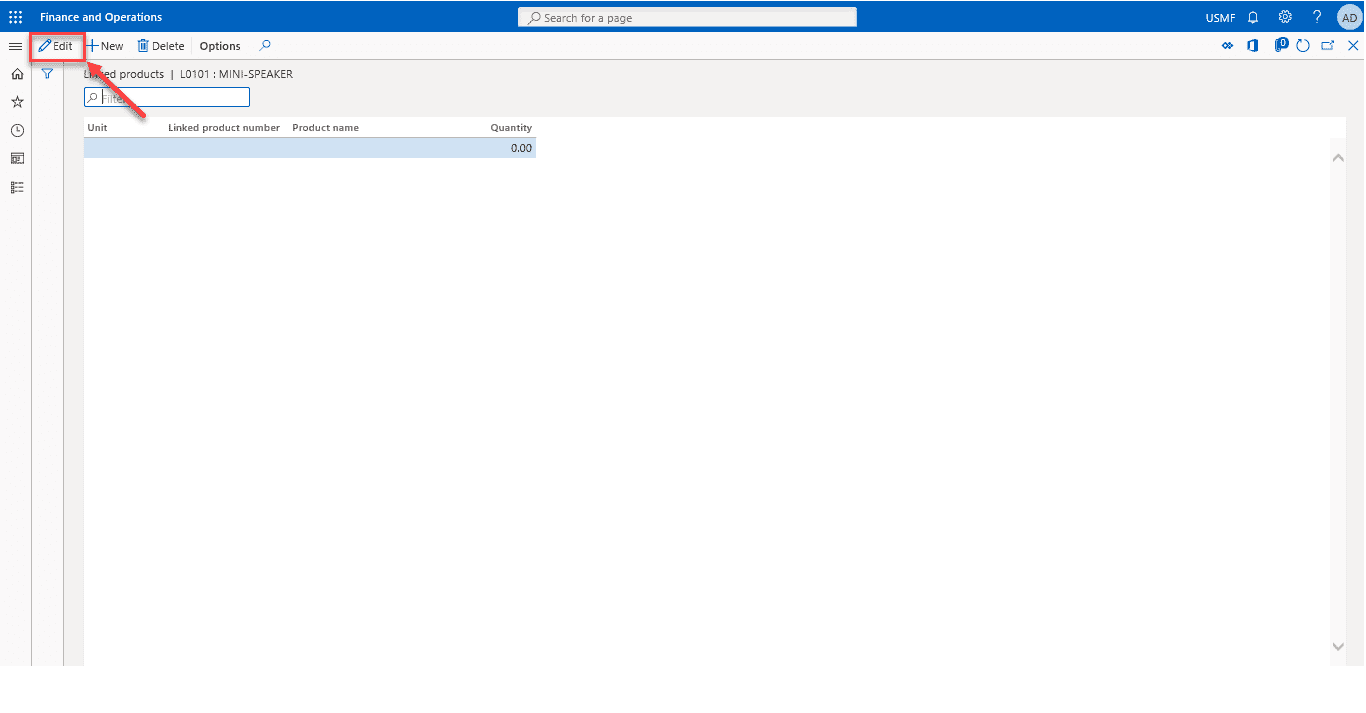
After clicking on the “Edit”. In the Linked product number field, click the drop-down button to open the lookup. In the list, click over the row to select the item you want to link to. Click on the Unit field’s drop-down button to open the lookup (you can select different units for the same linked item). In the Quantity field, enter the linked quantity. This is the quantity that will be added when entering the original item in the sales line. Finally, click Save.
Now, we will move on to the technical part of the Configure Link Products Process
The Data Model Behind the Link Products Process: Dynamics 365 F&S Technical Walk-through
We focused on the basic functional process and now we are going to move on to the technical part of the Configure Link Products Process.
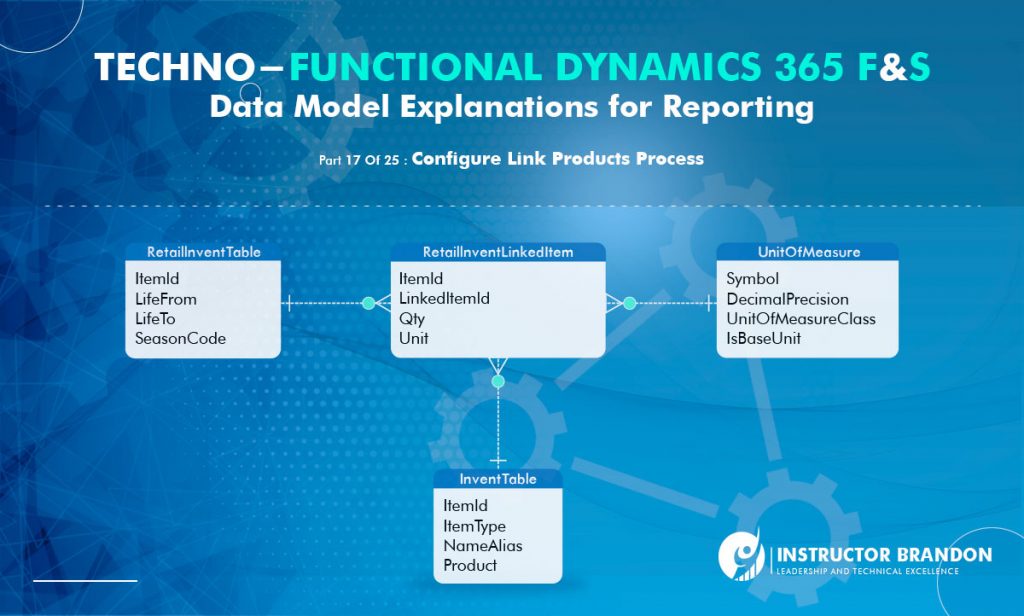
Entity Relationship Diagram: Configure Link Products Process in Dynamics 365
These are some of the important tables involved in the Configure Link Products Process in Dynamics 365. You can see the primary tables and the cardinality constraints.

Below you will see a Runnable Class to Configure Link Products Process
[sourcecode language=”c-sharp”] // Using USMF Contoso Company for sample dataclass ibCreateLinkedProduct
{
/// <summary>
/// Runs the class with the specified arguments.
/// </summary>
/// <param name = "_args">The specified arguments.</param>
public static void main(Args _args)
{
RetailInventLinkedItem retailInventLinkedItem;
InventTable inventTable;
//Get an existing product from InventTable
inventTable = InventTable::find(‘L0101’);
//Validate if the linked product already exists
retailInventLinkedItem = RetailInventLinkedItem::find(‘L0101’, ‘ea’, ‘L0100’);
if(!retailInventLinkedItem)
{
ttsbegin;
// Create the linked item:
retailInventLinkedItem.initValue();
retailInventLinkedItem.unit = UnitOfMeasure::findBySymbol(‘ea’).Symbol;
retailInventLinkedItem.linkedItemId = InventTable::find(‘L0100’).ItemId;
retailInventLinkedItem.itemId = inventTable.ItemId;
retailInventLinkedItem.qty = 2;
retailInventLinkedItem.insert();
ttscommit;
}
else
{
//Error message
error(strfmt("The specified record %1 already exist", retailInventLinkedItem.linkedItemId));
}
}
}
[/sourcecode]
Although there are many tables included in this process, we’re going to focus on two major tables. These two tables are ‘RetailInventLinkedItem’ and ‘InventTable’. Let’s go ahead and start with RetailInventLinkedItem.
RetailInventLinkedItem:
RetailInventLinkedItem table has information on linked items. Let’s have a look at some of its usefulness:
- This table is helpful when we need to be linked products details e.g. Unit symbol and Quantity
Below, we have listed down other significant fields of the RetailInventLinkedItem along with their respective descriptions.
| Field | Data Type | Description |
| Item Id | String | This field contains the item id number |
| Linked Item Id | String | This field contains the Linked item id number |
| Qty | Real | This field contains the quantity of the linked item |
| Unit | String | This field contains the unit symbol of the linked item |
Now let’s take a look at InventTable.
InventTable:
The InventTable table contains information about items. Let’s have a look at some of its characteristics:
- This table is an item representation including all product master data which is shared across all companies.
- The InventTable and its associated tables use the concept of the released product and can be treated as the instance of the particular product in the current company.
Next we will show you a few of the important fields of this table along with the description.
| Field | Data Type | Description |
| ItemId | string | This field contains the item id for the product |
| ItemType | int | This field contains the item type for product |
| NameAlias | int | This field contains the product search name |
Overview:
Through this blog post we understood the undermentioned:
- Covered the Configure Link Products Process in Dynamics 365 F&S.
- Reviewed the technical side of Configure Link Products.
- Discussed two major tables: RetailInventLinkedItem and InventTable.
- Discussed ways in which to use both tables.
We sincerely hope that you enjoyed part 17 of our exciting series on the Dynamics 365 data model. We aim to provide quality service at all times. And as always, if you need to reach me, you know how to get in touch by reaching out to me here. – Brandon Ahmad, founder of InstructorBrandon and Dynatuners

 5795
5795 