Data Model Series, Dynamics 365 Tutorials
Techno Functional Dynamics 365 Data Model Explanations for Reporting, Part 12 of 25 - How to Create a Department and Set Up its Hierarchy
Things have changed a lot since I started blogging over a decade ago. There are so many wonderful topics to blog and learn on today; it seems like one doesn’t even know where to start. To make the process more friendly, I’ve introduced a new sort of blog series with data model functionality, amazing ERD, and tables. Some very talented developers from my team have contributed their expertise to assist with this content approach to ensure that we keep our quality and quantity high. I hope you all sincerely enjoy the new approaches that we’ve innovated.. And as always, don’t hesitate to reach out to me.. I’m always here to help. — Brandon Ahmad
Create a Department in Dynamics 365
Get Microsoft Development Training and learn to create a Department in Dynamics 365 through our techno-functional walkthrough.
As a common practice, organizations require dealing with strategic Human Resource (HR) needs, and to achieve it, they have to carry out several processes in Dynamics 365, this is why, one of the most important functions is to create a ‘Department’ and set up its Hierarchy. Performing this process might not be very tough for you, but the problem lies in the inaccessibility of training/guidance to get hands-on experience on processes like this.
To help you get the right training, we have created this unique blog series that offers you learning Data Model behind several Microsoft Dynamics 365 processes—Create a department. This blog post offers step-by-step guidance through visuals, ERD, tables and X++ code, aiming to develop a clearer understanding of the process.
Let’s begin with the functional walkthrough.
Create a Department: Dynamics 365 Functional Walkthrough

Step 1
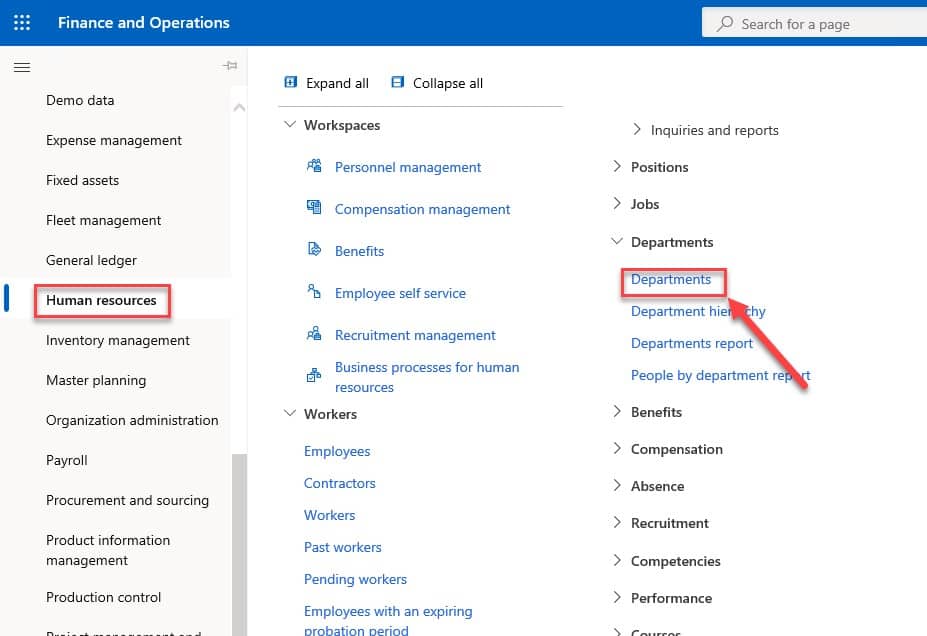
First, Go to ‘Human resources’ > ‘Departments’ > ‘Departments.’
Step 2
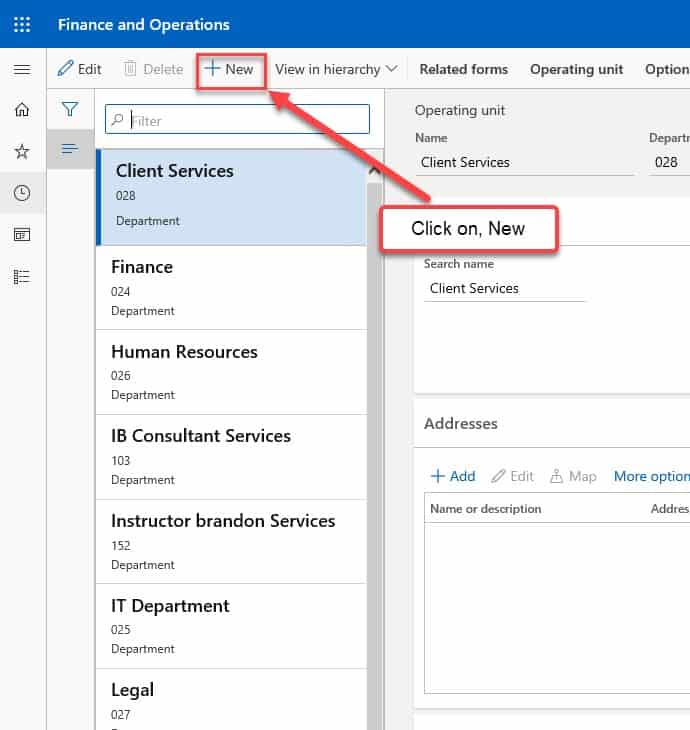
Then click on the ‘+New’ tab at the top left corner to open the drop dialog.
Step 3
In the ‘Operating unit’ section enter Name, Department number and select Operating unit type. In the ‘Memo’ field, enter memo details if required. And in the ‘Manager’ field, select the name of the manager. Then click ‘Save’ at the top left corner and close the page.
Step 4
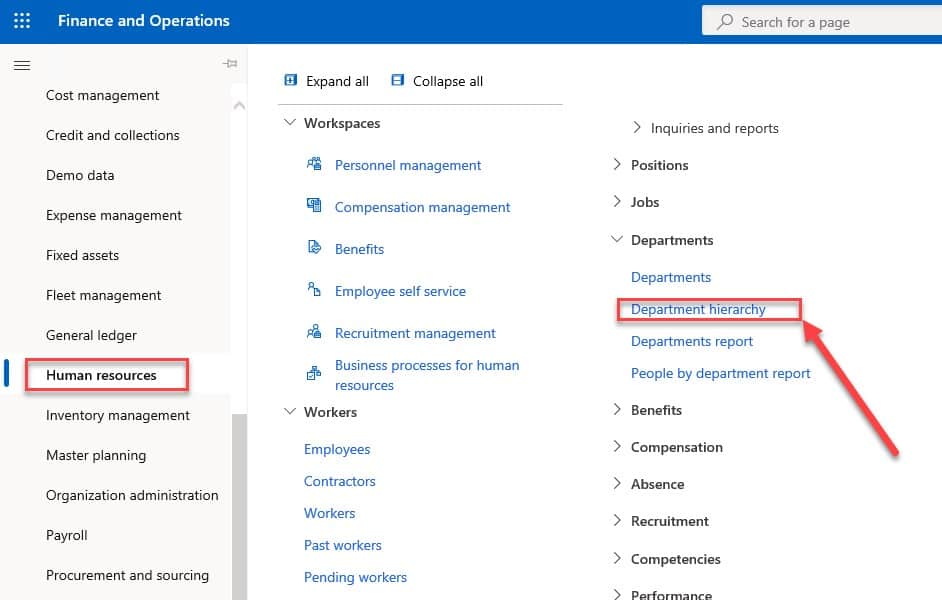
Now, go to ‘Human resources’ > ‘Departments’ > ‘Department hierarchy.’
Step 5
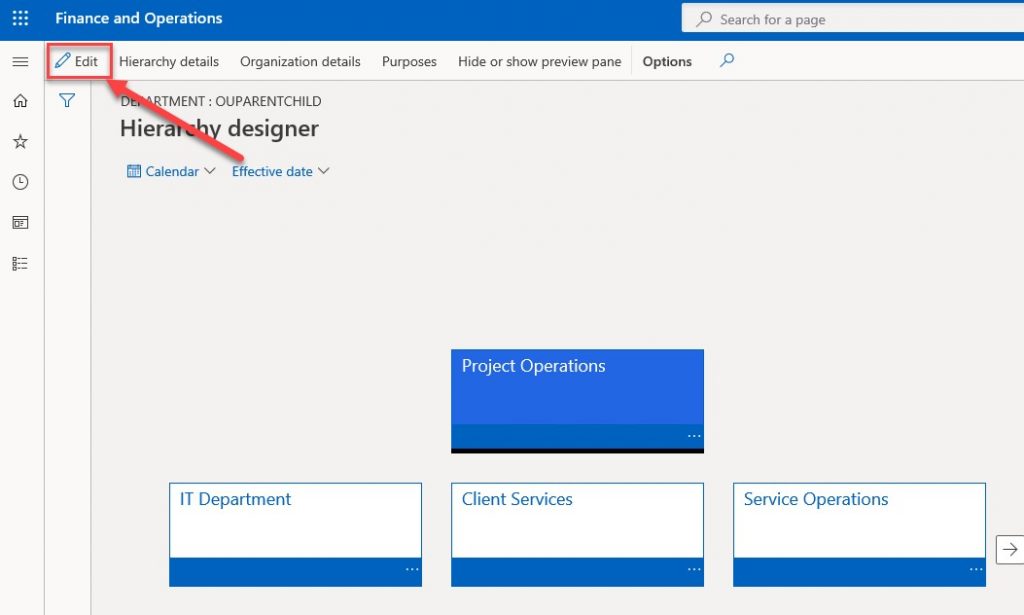
Click ‘Edit.’
Step 6
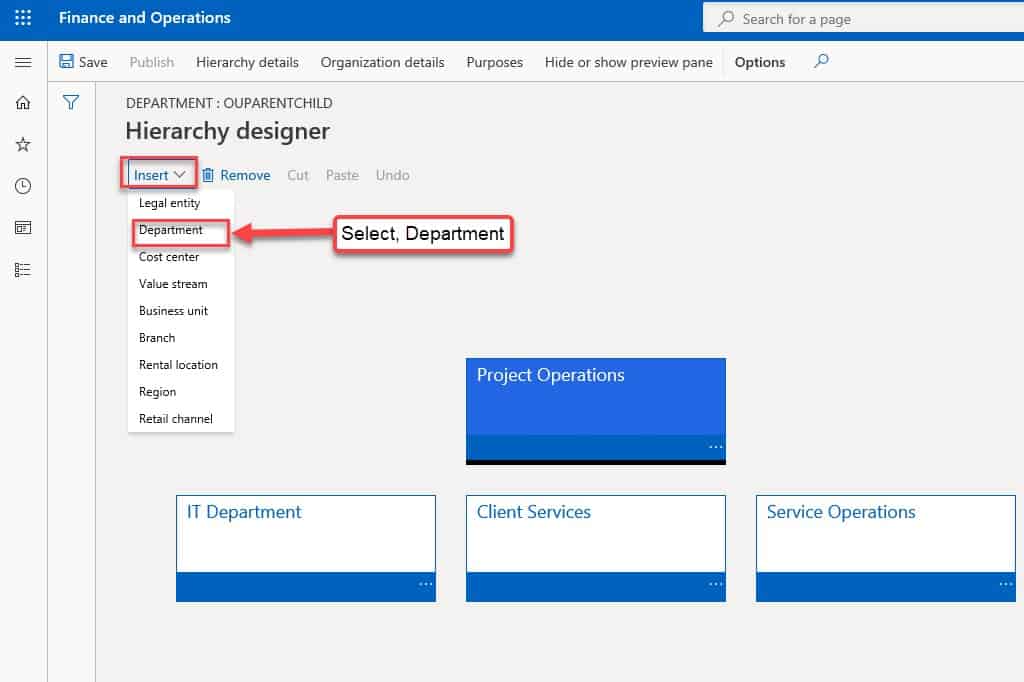
Then click ‘Insert’ and select ‘Department’ option from the drop down.
Step 7
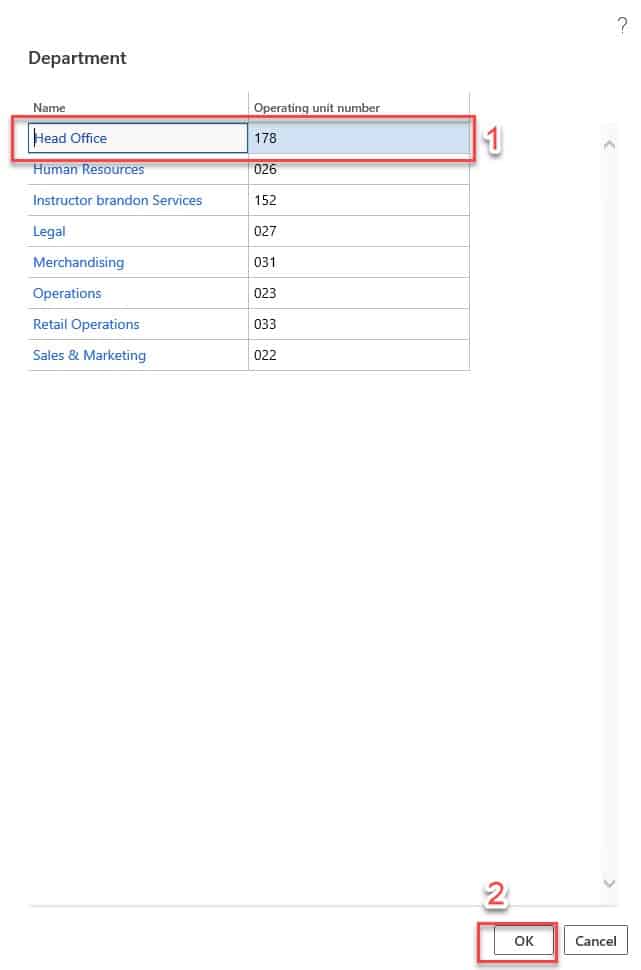
Now you will be directed to the list ‘Department’ having all the departments listed along with the Name and Operating unit number. Here you can find and select the desired record and then click ‘OK.’
Step 8
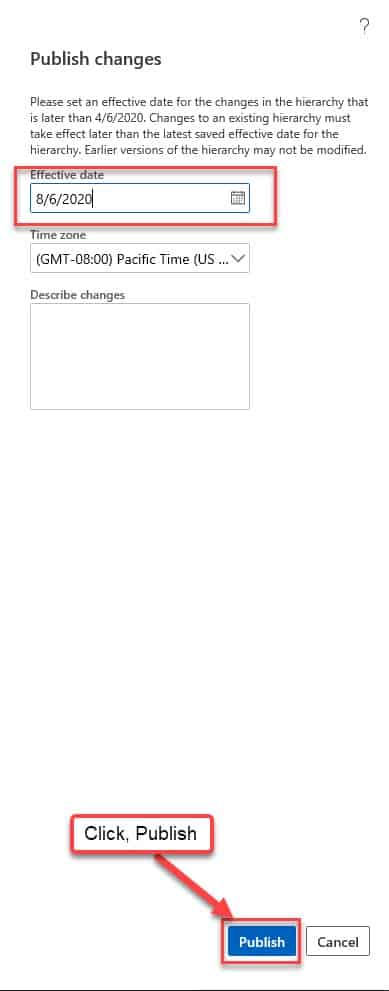
In the ‘Effective date’ field, enter a date and in the ‘Time Zone’ field, select time zone. In the ‘Describe changes’ field, type to describe changes. Finally click ‘Publish.’
Create a Department: Dynamics 365 F&S Technical Walkthrough
In this part, you will learn the how to create a department by looking at the technical walkthrough behind this process. Let’s start with the Entity Relationship Diagram (ERD).
Entity Relationship Diagram: D365 Create a Department
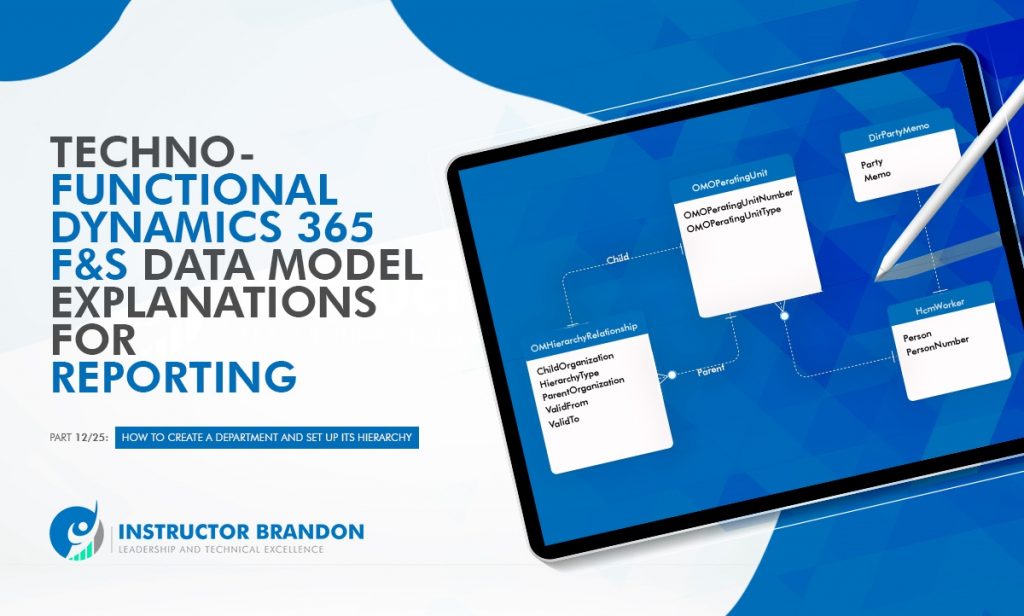
You will get the deep understanding of the process by looking at the ERD diagram below which includes main tables involved to create a department.
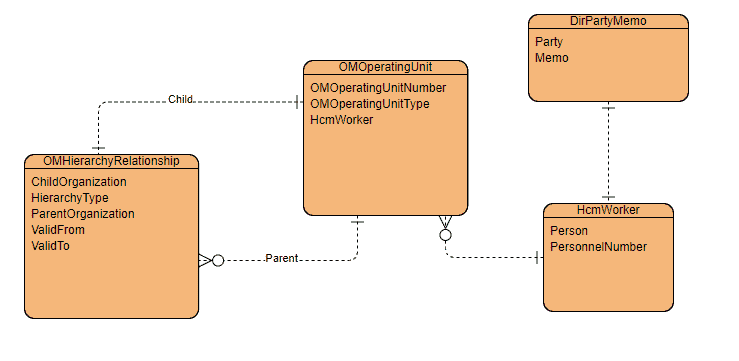
Below you will see a Runnable Class (job) to create a department in D365.
[sourcecode language=”c-sharp”] class IBDepartmentCreation{
/// <summary>
/// Runs the class with the specified arguments.
/// </summary>
/// <param name = "_args">The specified arguments.</param>
public static void main(Args _args)
{
OMOperatingUnitEntity departmentunit;
str OperatingUnitNum = "2332";
try
{
//Create a new record in OMOperationUnit entity
departmentunit.clear();
departmentunit.Name = "TestDepartment1"; // Department Name
departmentunit.OperatingUnitNumber = OperatingUnitNum; // Department Unit
departmentunit.OperatingUnitType = OMOperatingUnitType::OMDepartment; // Operating Unit Type – Department
departmentunit.ManagerPersonnelNumber = "000002";
departmentunit.insert(); // Inserting the record
info(strFmt("Department ‘%1’ has been created.", departmentunit.Name));
//Display newly created record
select forupdate departmentunit where departmentunit.OperatingUnitNumber==OperatingUnitNum;
info(strfmt("Found newly created deparment ‘%1’ with Operating Number ‘%2’",
departmentunit.Name, departmentunit.OperatingUnitNumber));
//Now delete the record from the entity
departmentunit.delete();
select departmentunit where departmentunit.OperatingUnitNumber==OperatingUnitNum;
info(strfmt("Deleted Department does not exist: OperatingUnitNumber- %1", departmentunit.OperatingUnitNumber));
}
catch(Exception::DuplicateKeyException)
{
info("Caught ‘Exception::DuplicateKeyException’. Record already exists.");
}
}
}
[/sourcecode]
Now let’s look at the tables involved in the process of creating a customer in Dynamics 365.
OMOperatingUnit
The OMOperatingUnit table is:
- considered as the base table for all operating units.
- helpful in tracking the information related to all the operating units.
- able to retrieve information related to manager details and organization type.
| Field | Data Types | Description |
| OMOperatingUnitNumber | String | Operating unit number |
| OMOperatingUnitType | Base Enum | Types of operating unit e.g. Department, Cost Center, Region, etc. |
| HcmWorker | Int64 | Information of assigned manager in the operating unit. |
OMHierarchyRelationship
The OMHierarchyRelationship table contains:
- Hierarchy information of the organization.
- all the parent and child node information along with valid FromDate and ToDate.
- information of Hierarchy type of Organization helpful in reporting purposes.
| Field | Data Types | Description |
| ChildOrganization | Int64 | Child Organization of the organization hierarchy |
| HierarchyType | Int64 | Hierarchy type such as Department, Cost center |
| ParentOrganizaiton | Int64 | Parent Organization of the Organization Hierarchy |
| ValidFrom | DateTime | The time from which this record is valid for Organization Hierarchy |
| ValidTo | DateTime | The time up to which this record is valid for Organization Hierarchy |
DirPartyMemo
DirPartyMemo table contains additional information about the parties.
| Field | Data Types | Description |
| Party | Int64 | Information about parties of the company. |
| Memo | String | Additional memo text; enhanced information of parties of the company |
HcmWorker
The HcmWorker table:
- contains the records of the employees and contractors that are further used with the HRM and payroll tables.
- can retrieve all the information of employees and contractor.
- stores all the personal information of employees such as person name and person contact number.
- is very useful for reporting purposes.
| Field | Data Types | Description |
| Person | Int64 | DirPartyRecId information with the name of the person |
| PersonnelNumber | String | A personnel number assigned to employee/worker by employer/organization and is used to track different records. |
Summary
In this post, you have:
- Learned how to perform an important Human Resource (HR) process in Dynamics 365-Creating a Department
- Familiarized yourself with step-by-step procedures for the process
- Explored the technical aspects of Department Creation Process
- Looked at ERD, tables and X++ runnable code for the process
- Understood the importance of the major tables along with their fields and functions
In the next blog posts for this series, you will learn to create a job in the Human Resource module by understanding the data model. You will also be able to learn functional and technical aspects of creating a job in Dynamics 365.
We sincerely hope that you enjoyed part 12 of our exciting series on the Dynamics 365 data model. We aim to provide quality service at all times. And as always, if you need to reach me, you know how to get in touch by reaching out to me here. — Brandon Ahmad, founder of InstructorBrandon and Dynatuners

 6500
6500 