Dynamics 365 Tutorials, Supply Chain and Logistics Management
D365 Work Order Sequencing: Tested Strategies to Optimize Operational Efficiency
System-Directed Work Sequencing for Warehouse Operations
Order Process | Master Planning | Warehouse Efficiency | Outbound Workload Visualization
This blog sheds light on the work order sequencing of your warehouse operations and how you can use Dynamics 365 WMS to generate a system-directed sequence to increase the accuracy of your orders.
The work order, expectedly, is the order of the tasks led by your warehouse team. However, some businesses also refer to work sequence as their operational arrangement.
Every warehouse management process should follow a logical order. For example, let’s say you have an assembly line for a sedan car. It is logical to install the tires on wheels first before you mount them on the chassis. However, the thing often overlooked is the order.
A well-planned warehouse process will have tools and parts positioned at the assembly point. This will also help you to keep an efficient flow of work. An efficient flow of work might also include the completion of other tasks between the installation of each wheel. Otherwise, your assembly might not be able to mount them. The figure below shows the process flow for a standard work order:
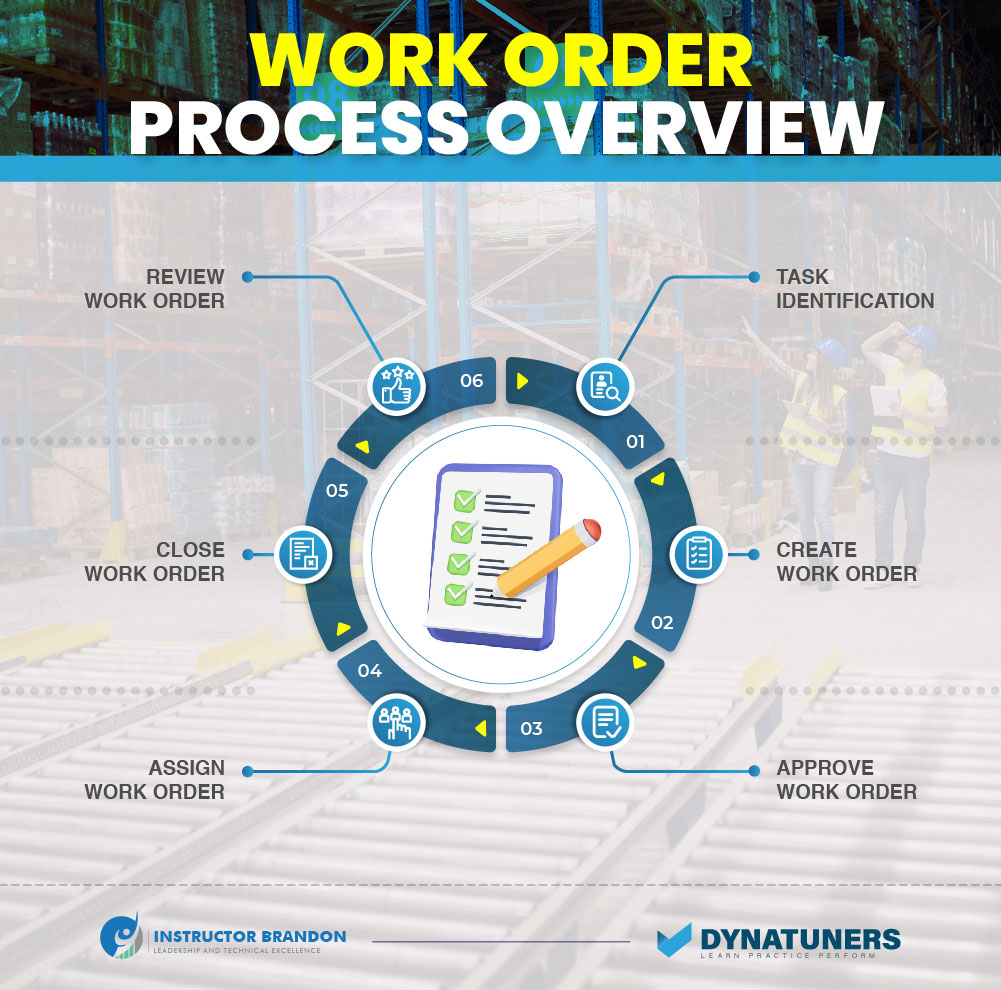
You would have heard of system-directed picking if you are familiar with the Microsoft WMS. Extending the order picking feature, the system-directed work sequencing further allows you to set sequencing on one or multiple queries and evaluate all work orders at once.
Considering the importance of sequencing, we decided to post a detailed blog on it and see whether it is a good idea to generate system-directed work order using Dynamics 365 WMS or not.
What is System-directed Work Sequencing?
System-engaged sequencing allows you to sort and filter the work orders that the system offers to users for execution. It uses a mobile device task for your team while keeping operational accuracy on the go.
With the correct sequencing, you can define pre-set logic to outline what operation to execute through an interactive mobile device menu item.
Using it, you can sort and filter the order of operation that the system offers to users for implementation. Such functionality becomes quite handy when you have a few criteria to consider.
The filters could include the time of dispatch, the picking area, the location details, or a variety of scenarios to drive warehouse operations.
SUMMARY
There are two ways to sequence your work order in D365. One way is directing your work orders manually, based on your requirements. However, you would have to assign each work with a sequence number every time it is needed. The second way is through system-directed sequencing.
How Does it Work?
One of your workers signs in, and based on your pre-set details, a piece of work is automatically strapped onto his device. This will eliminate the need to pick tickets for work details physically. Because the logic is pre-determined, the mobile menu will only show work ID within a specific area.
Meanwhile, another worker logs in he gets assigned a specific Work ID within his zone.
Similarly, you can configure system-directed sequencing in a lot of ways. For instance, you can set up the Menu item to show tasks by work type, customer account process, item number, work priority, etcetera.
With some intelligent configuration from experts, you can direct your warehouse management to focus on specific orders by allowing them to access the related Menu item. The below table summarizes the information you can place on any work order.
Work Order Information Summary |
||
| Word Order 1 | Work Order 2 | |
| Work Required at | Water pipe | Light Fixture |
| Location | Production house 51 | Warehouse 20 |
| Impact on | Connecting pipes
Water flow Drywall |
Light
Room
|
| Change Information | Information about the impact and changed components (type, cost, dimension, etc.) | Information about the replaced Light Fixture |
| Need for follow up | New WO for impacted elements | |
| Changed Propagation | Piper system and impacted elements | |
| Update to Component | Required | Required |
| Update on Impacted Components | Required | |
| Update to Drawings/model | Required | |
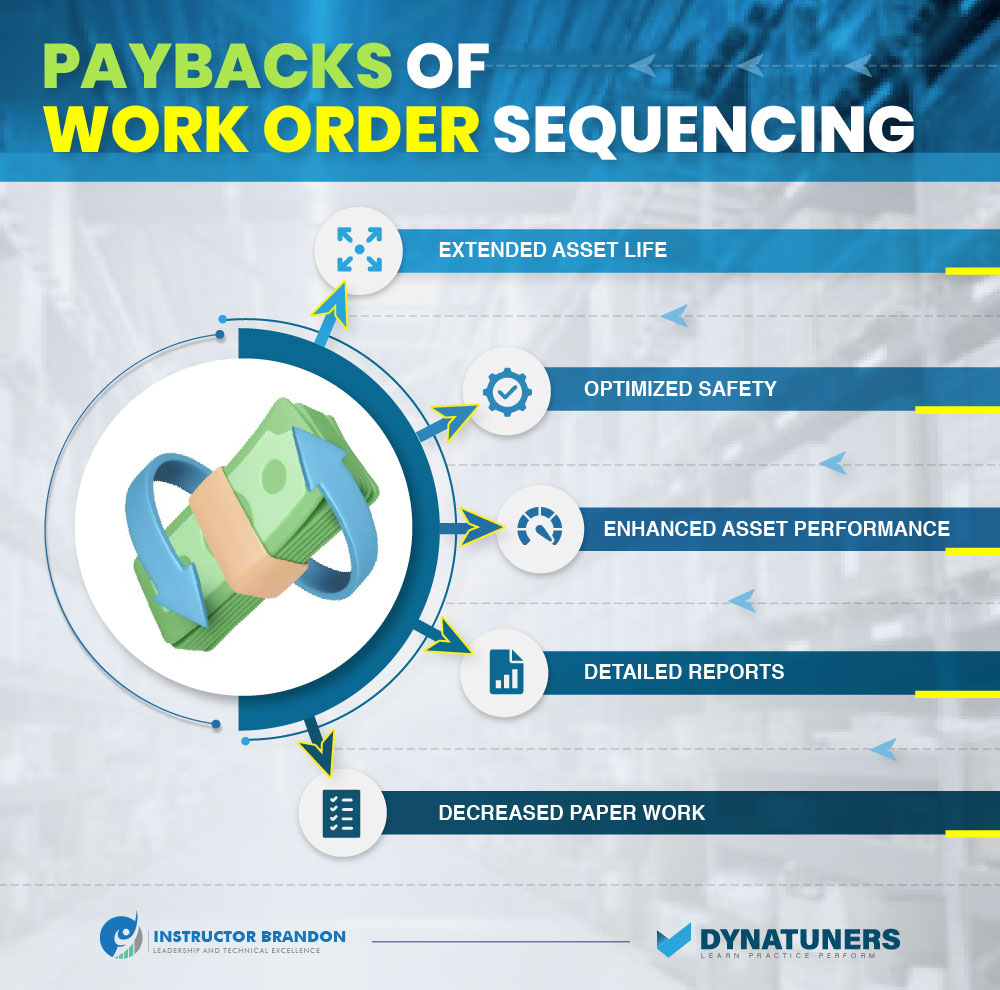
Once you go for system-directed sequencing, it does not run on itself. Instead, it asks for some clever configuration to attain the right and required sequence of work with some prominent paybacks.
The Algorithm of System-directed Work Sequencing
Warehouse operations consist of schedules from location 1 to location 2. With a sophisticated WMS setup, you can use system-directed abilities to plan, prioritize, define, and assign work to users.
The below figure explains the concept of how it works. In the figure, a planner or manager releases the Work Orders (WOs) for sequencing. The system can also auto-generate the WOs, or an event in the terminal environment can trigger the generation.
Typically, the warehouse zone defines the sequencing, including outbound, internal, and inbound sequencing. Depending on your warehouse layout setup, you can direct the system to set up priority-based sequencing.
When the resource is looking for a job, the system loops through the first sequence and selects the first available worker to assign the resource.
Similarly, the system will move to the next queue if there are no Work Orders in the sequence. Therefore, if no WOs available in the line, the algorithm stops there.
This is the case when the system directs the work sequence. However, your business structure may require a scenario where your planner must assign a work sequence manually.
SUMMARY
The above functionality makes the overall performance of your system algorithm dependent. At Dynatuners, we back our clients with the correct customization and make the system efficient by generating optimal decisions.
Setting up System-direct Work Sequencing in D365
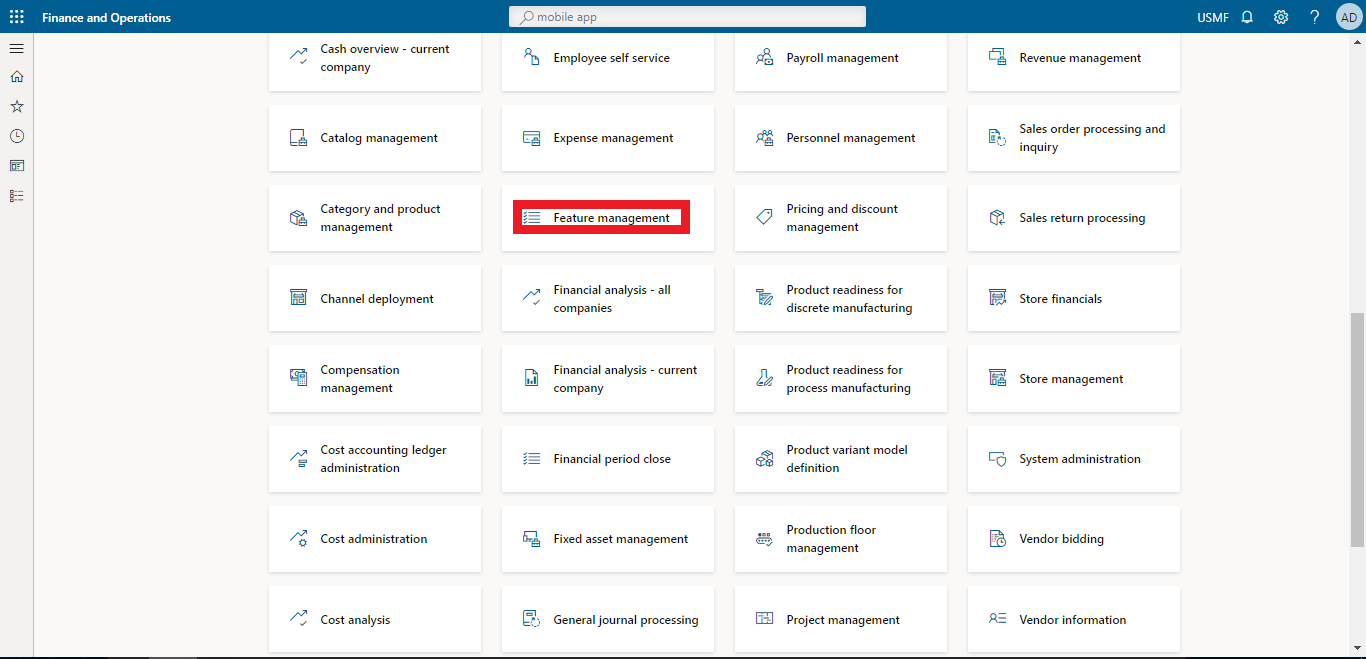
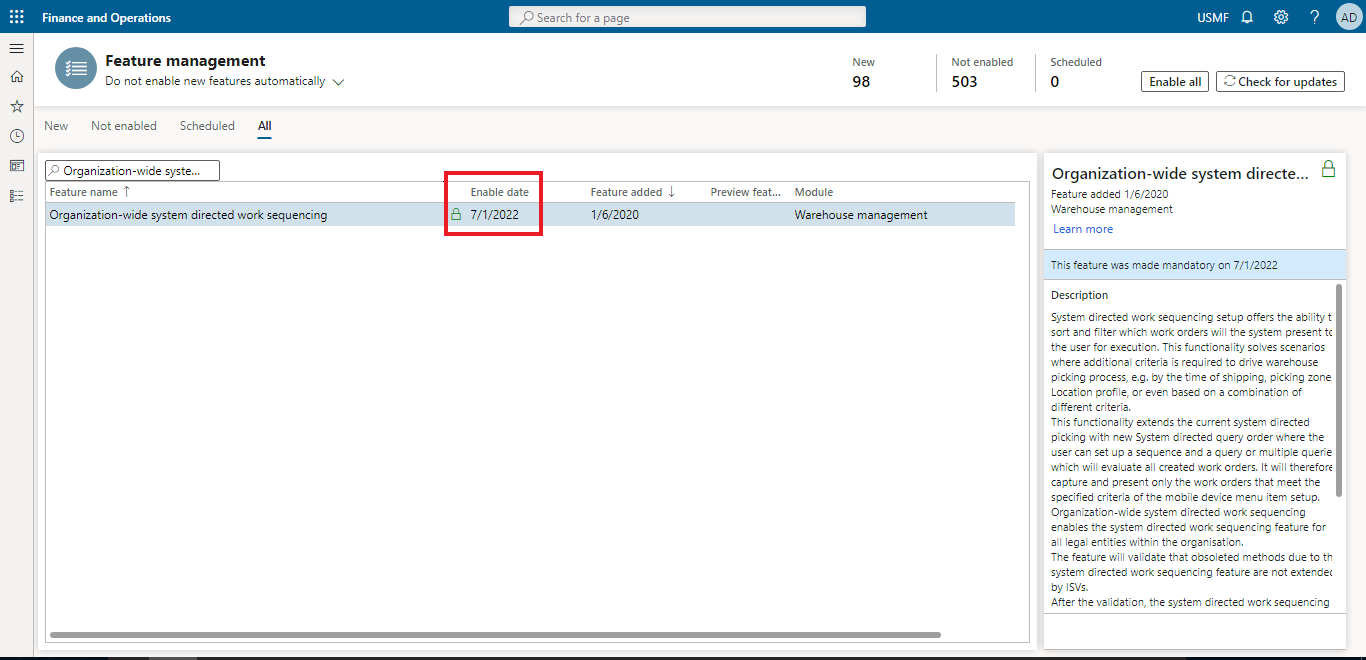
For this, we have to activate the organization-wide system-directed work sequencing feature from the feature management.
Step 1
Go to Feature management in the search bar, write the feature in all options, and tap the enable now button at the bottom right. The feature will be enabled.
Set up a mobile device menu item
Step 1
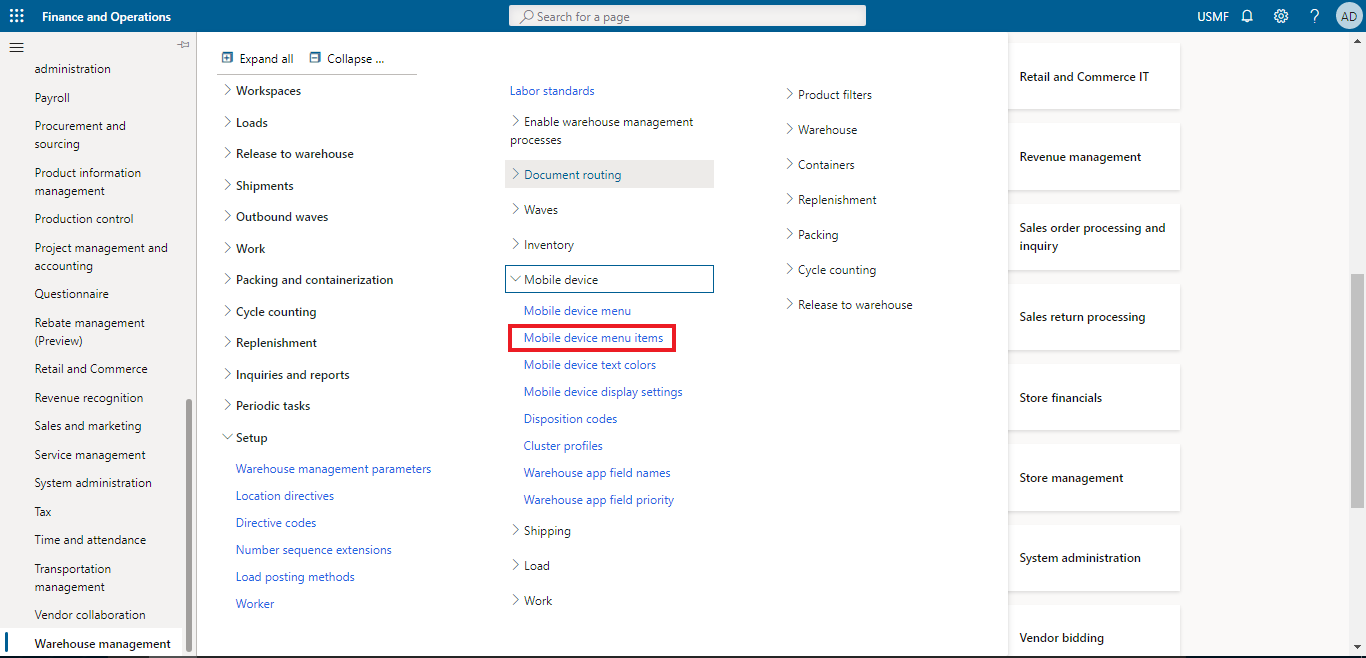
Go to Warehouse Management => Setup => Mobile Device => Mobile Device Menu Items.
Step 2
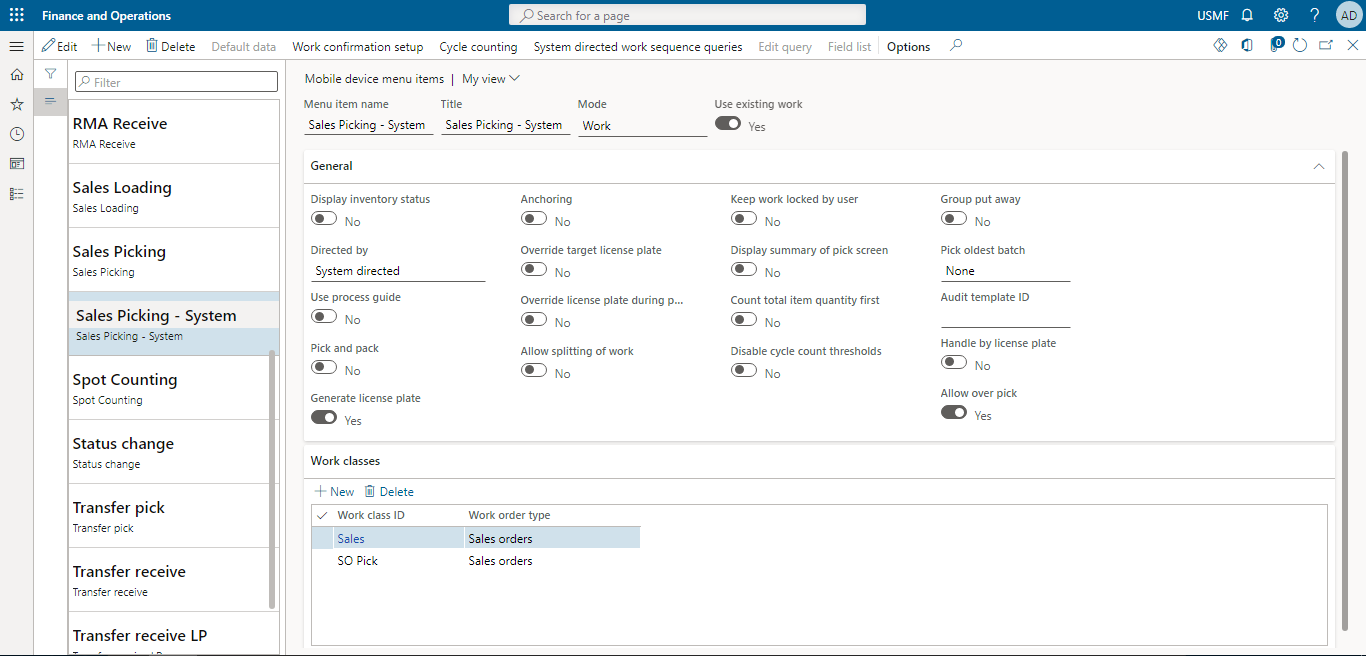
In the list of the mobile device menu, tap Sales Picking – System.
Step 3
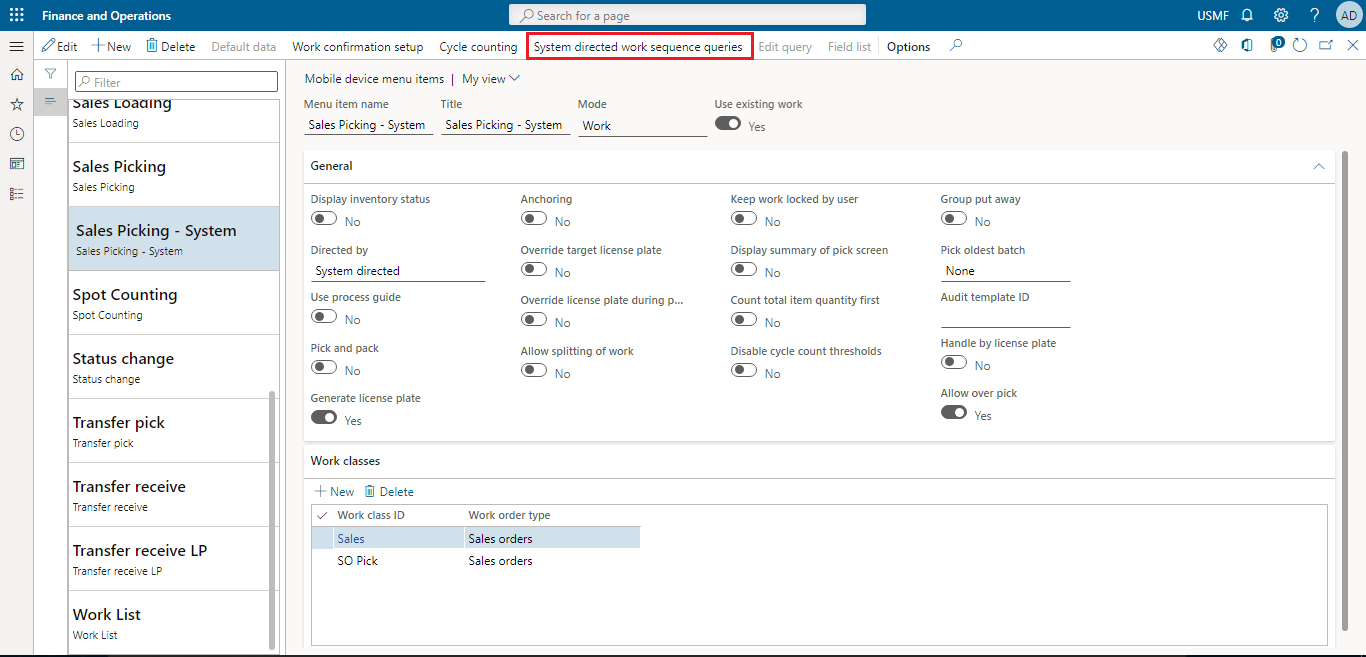
We have to do some settings on this page; go to tab General => Directed by and select the System Directed option.
Step 4
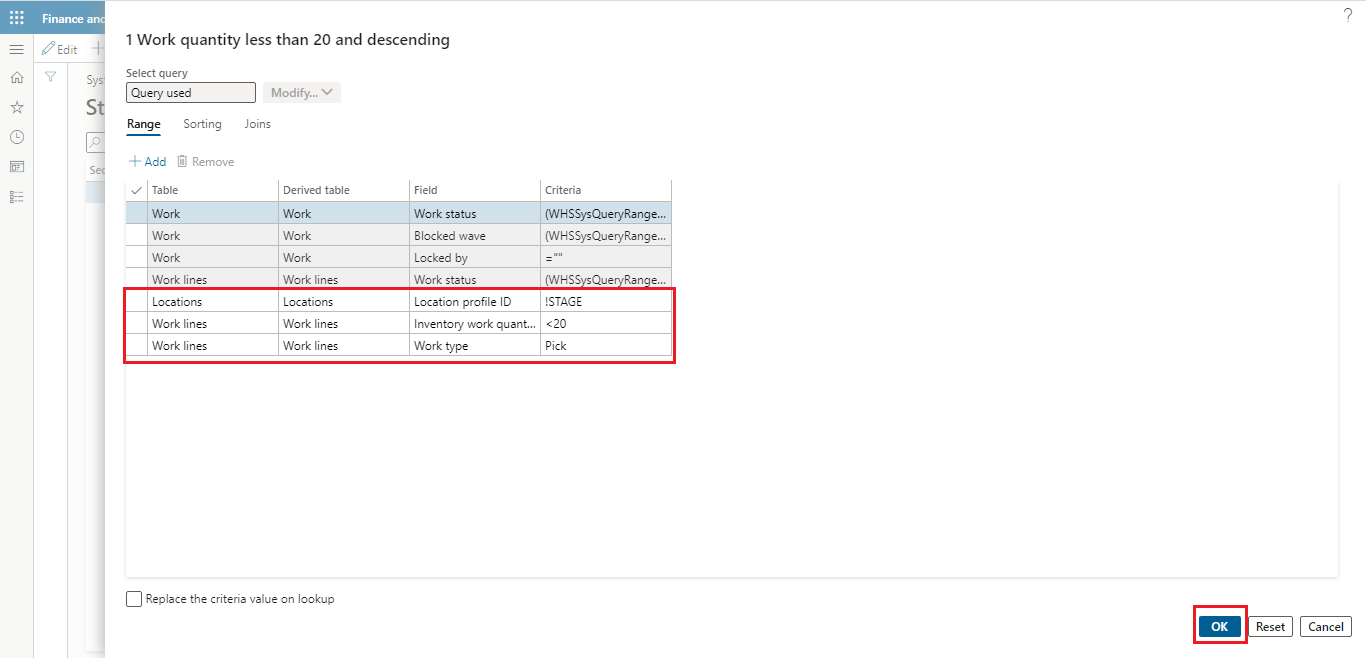
In the work classes tab, the following settings will be visible:
| Work Class ID | Work Order Type |
| Sales | Sales orders |
| SO Pick | Sales orders |
Step 5
Set the settings per the screenshots, as they will guide you to apply the rest of the settings in the Setup mobile device menu items.
Step 6
In these mini-lessons, everything is explained step by step to access each location and what details will be needed to add in the relevant fields.
Location Directives
Step 1
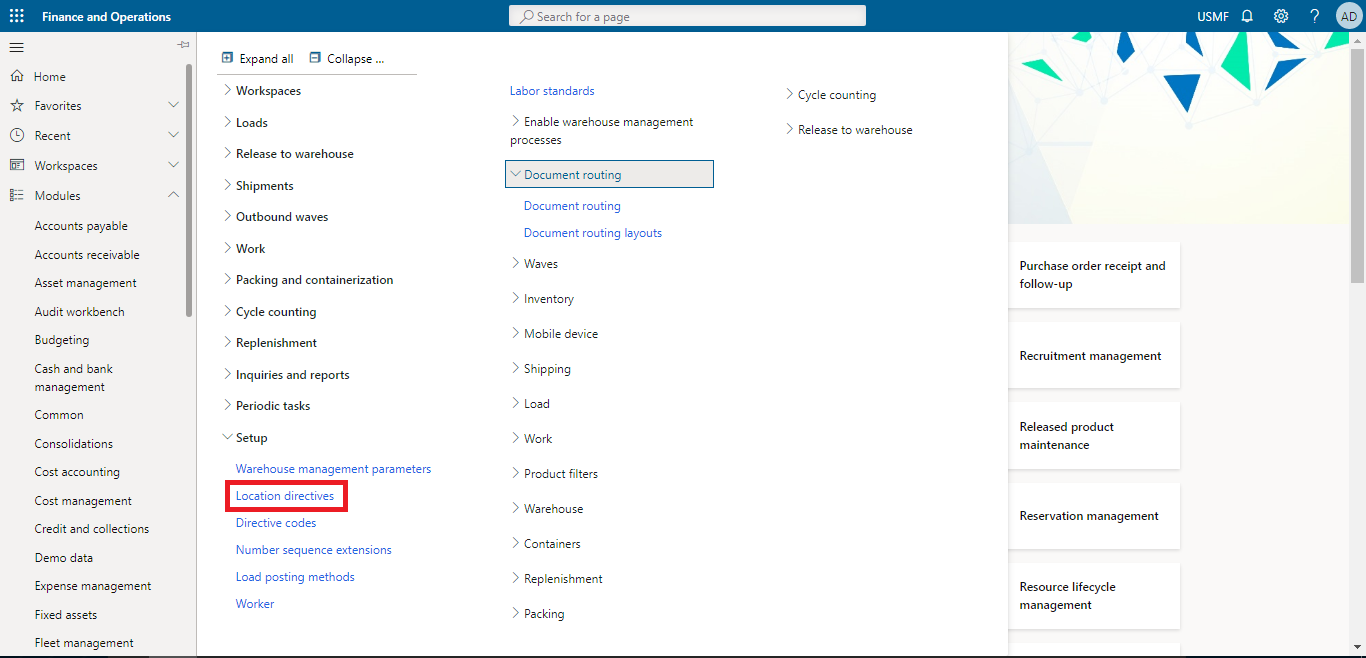
Go to Warehouse Management > Setup > Location Directives to set up the location directives.
Step 2
In the work order type field, select sales orders.
Step 3
Select the location directive with the name 51 Pick.
Step 4
On the Location Directive Actions tab in the lower section, select the line for the pick action.
Step 5
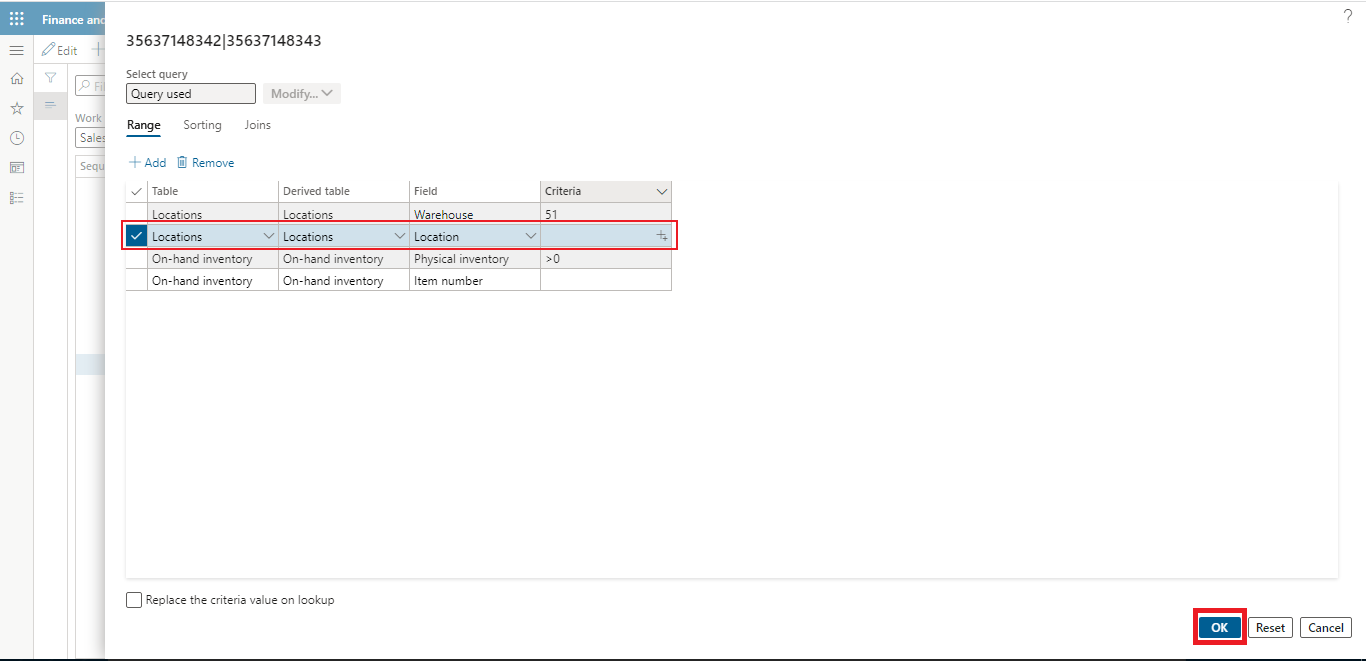
In the upper grid, select the option Edit Query.
Step 6
Tap on the Range option.
Step 7
When the lines appear, check the one with the Location option, which has no criteria in the criteria section.
Sales Order Picking Work
In this section, we have to create four sales orders one by one and release them to the warehouse once all the steps and procedures are completed.
Sales Order No. 1
Step 1
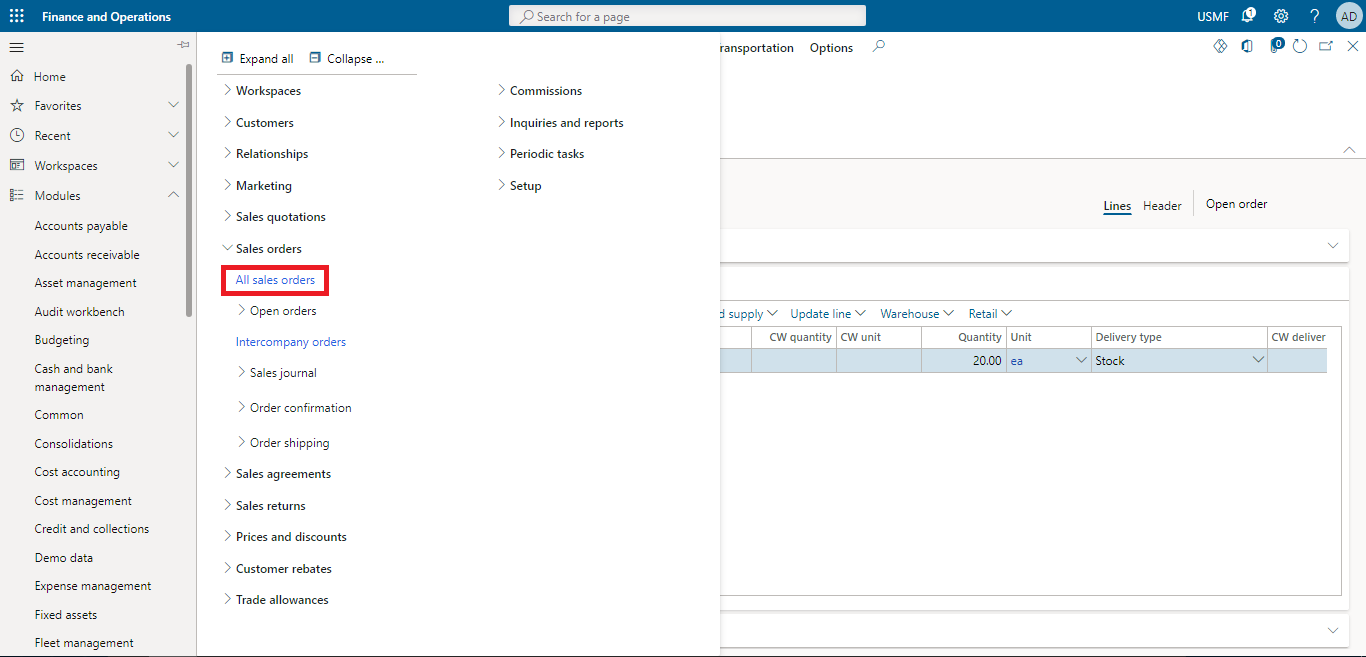
Go to Sales and marketing > Sales orders > All sales orders.
Step 2
On the Action Pane, select New to create sales order 1.
Step 3
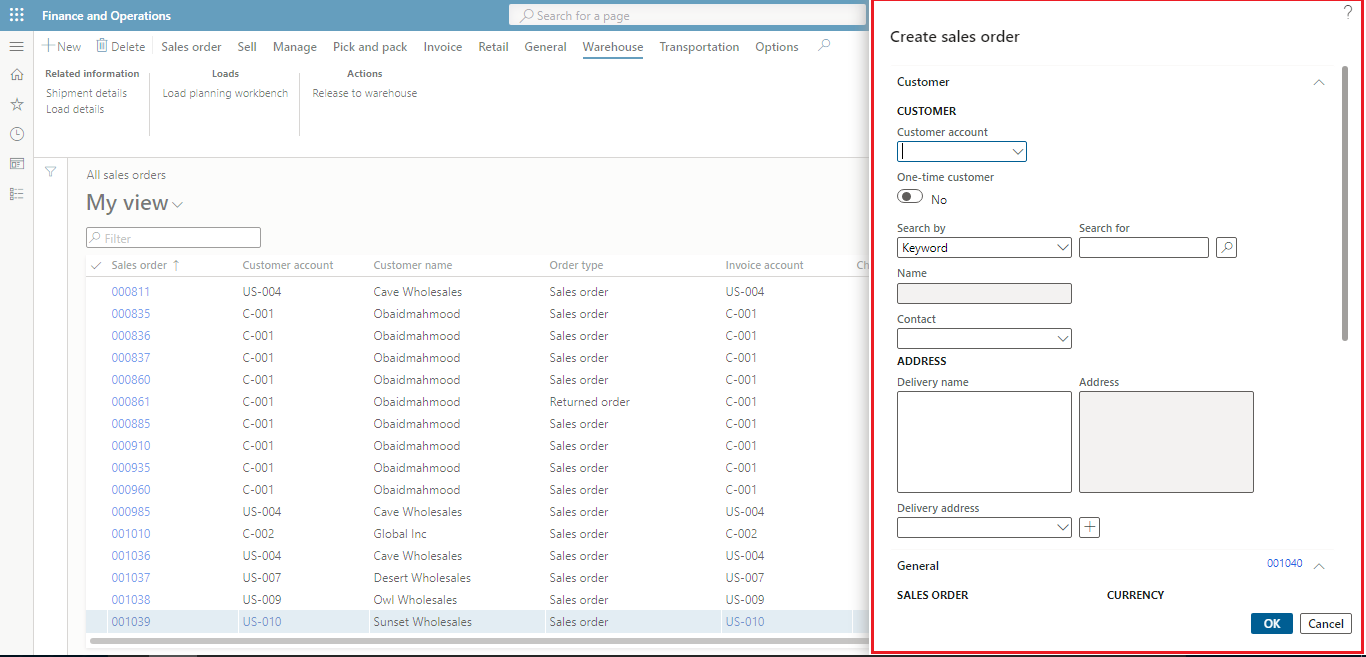
In the Create sales order dialog box, set the following values:
Step 4
In the Customer section, set the Customer account field to US-004.
Step 5
In the General section, set the Warehouse field to 51.
Step 6
Select OK to close the dialog box. Finally, make a note of the sales order number.
Step 7
Add a line to the new sales order, and set the following values:
Item number: M9200
Quantity: 20
Step 8
On the Inventory menu, above the grid, select Reservation.
Step 9
On the Reservation page, select Reserve lot to reserve the inventory.
Step 10
Close the Reservation page.
Step 11
On the Action Pane, on the Warehouse tab, select Release to the warehouse to create work for the warehouse.
Sales Order No. 2
Step 1
Create another sales order in the same way as we created before.
Step 2
In this sales order, select the customer account US-007 and warehouse 51 and press OK.
Step 3
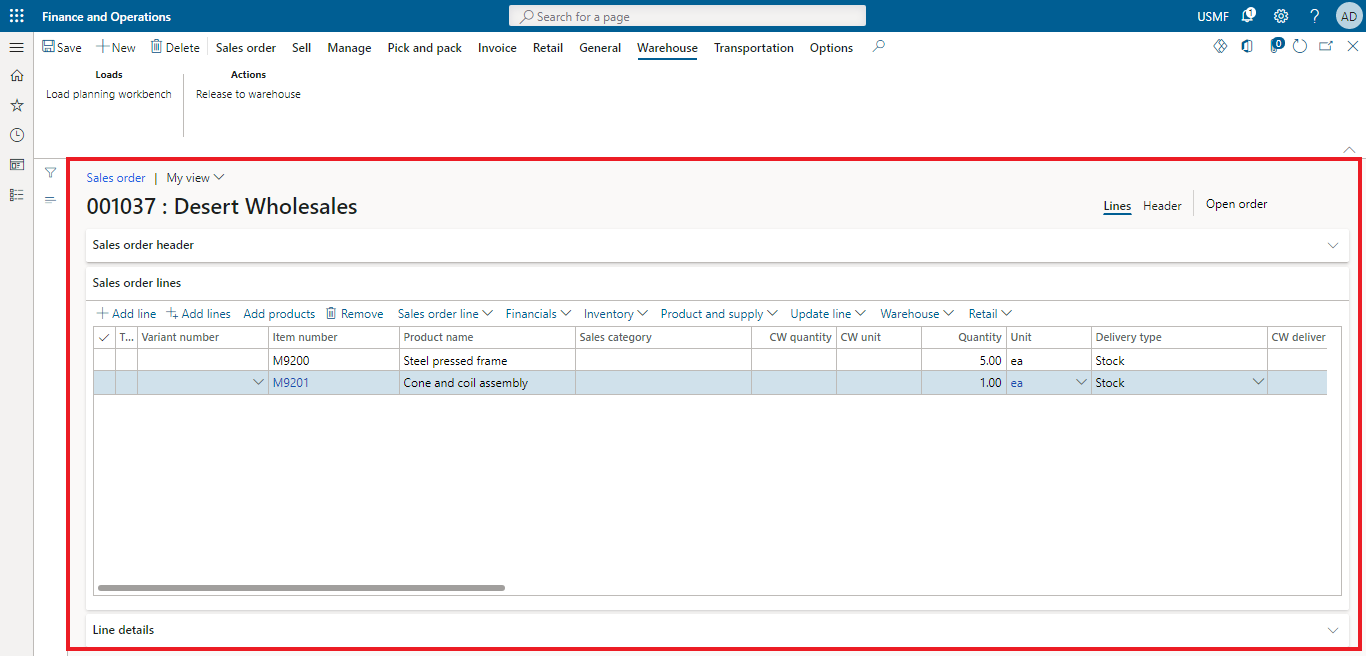
In this sales order, add two lines.
Step 4
In the first line, select the item number M9200; in quantity, enter 5.
Step 5
In the second line, select the item number M9201; in quantity, enter 1.
Step 6
On the Inventory menu, above the grid, select Reservation.
Step 7
On the Reservation page, select Reserve lot for inventory reserve.
Step 8
Close the Reservation page.
Step 9
On the Action Pane, on the Warehouse tab, select Release to warehouse to create work for the warehouse.
Sales Order No. 3
Step 1
Create another sales order.
Step 2
Select the customer account US-009 and warehouse 51 and press Ok.
Step 3
Create two lines; in the first line, select the item number M9200; in quantity, enter 7.
Step 4
In the second line, select the item number M9202; in quantity, enter 8.
Step 5
On the Inventory menu, above the grid, select Reservation.
Step 6
On the Reservation page, select Reserve lot to reserve the inventory.
Step 7
Close the Reservation page.
Step 8
On the Action Pane, on the Warehouse tab, select Release to warehouse to create work for the warehouse.
Sales Order No. 4
Step 1
Create another sales order.
Step 2
Select the customer account US-010 & warehouse 51 and press OK.
Step 3
Create two lines; in the first line, select the Item number M9200; enter quantity, enter 25.
Step 4
In the second line, select the Item number M9202; in quantity, enter 10.
Step 5
On the Inventory menu, above the grid, select Reservation.
Step 6
On the Reservation page, select Reserve lot to reserve the inventory.
Step 7
Close the Reservation page.
Step 8
On the Action Pane, on the Warehouse tab, select Release to the warehouse to create work for the warehouse.
Work IDs for the work
Step 1
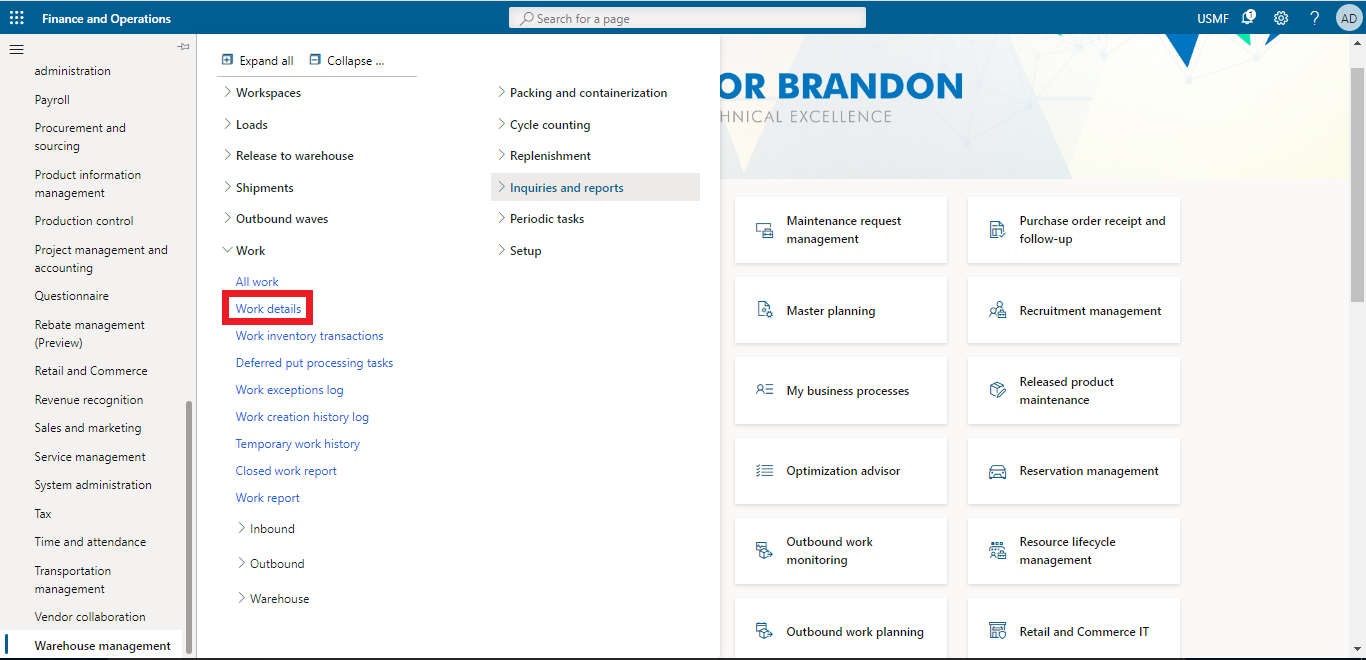
To create work IDs, Go to Warehouse management > Work > Work details.
Step 2
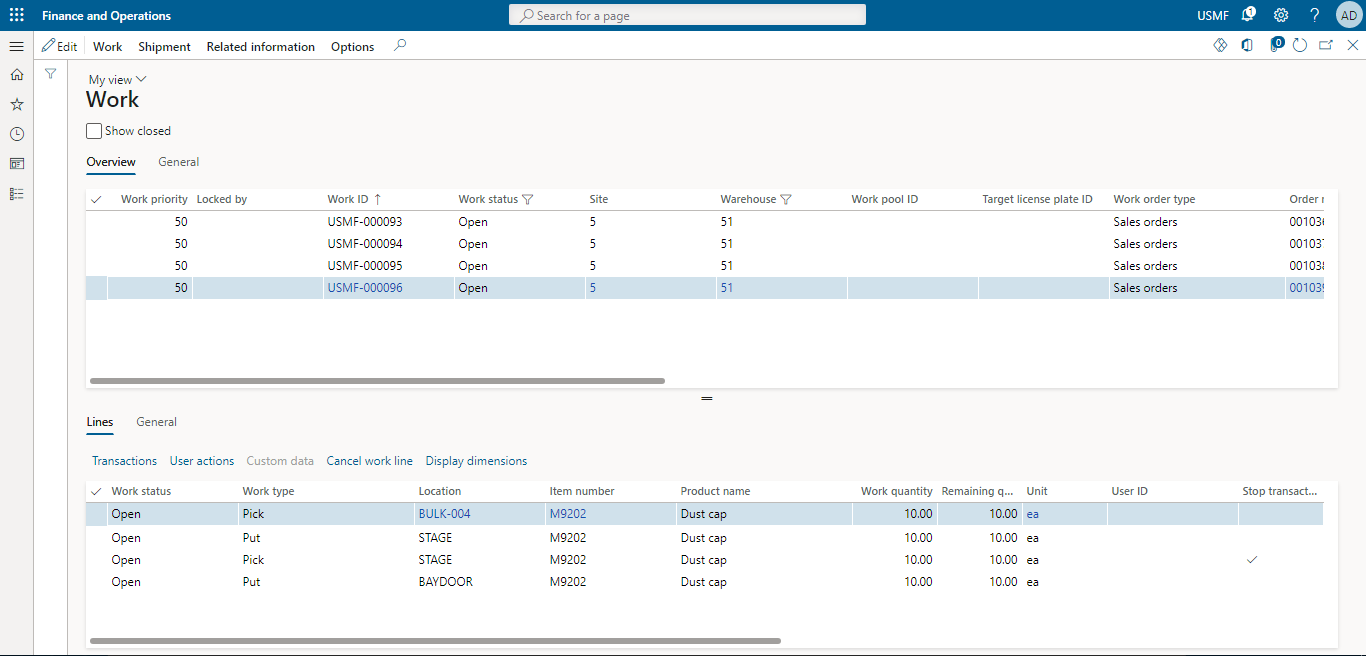
Right-click on the Warehouse field, apply the filter, select the option exactly, and enter 51 in the box.
Step 3
Doing this will allow us to see only warehouse no 51.
Step 4
The system will create Four work IDs.
Step 5
Make a note of the work ID for each sales order.
Step 6
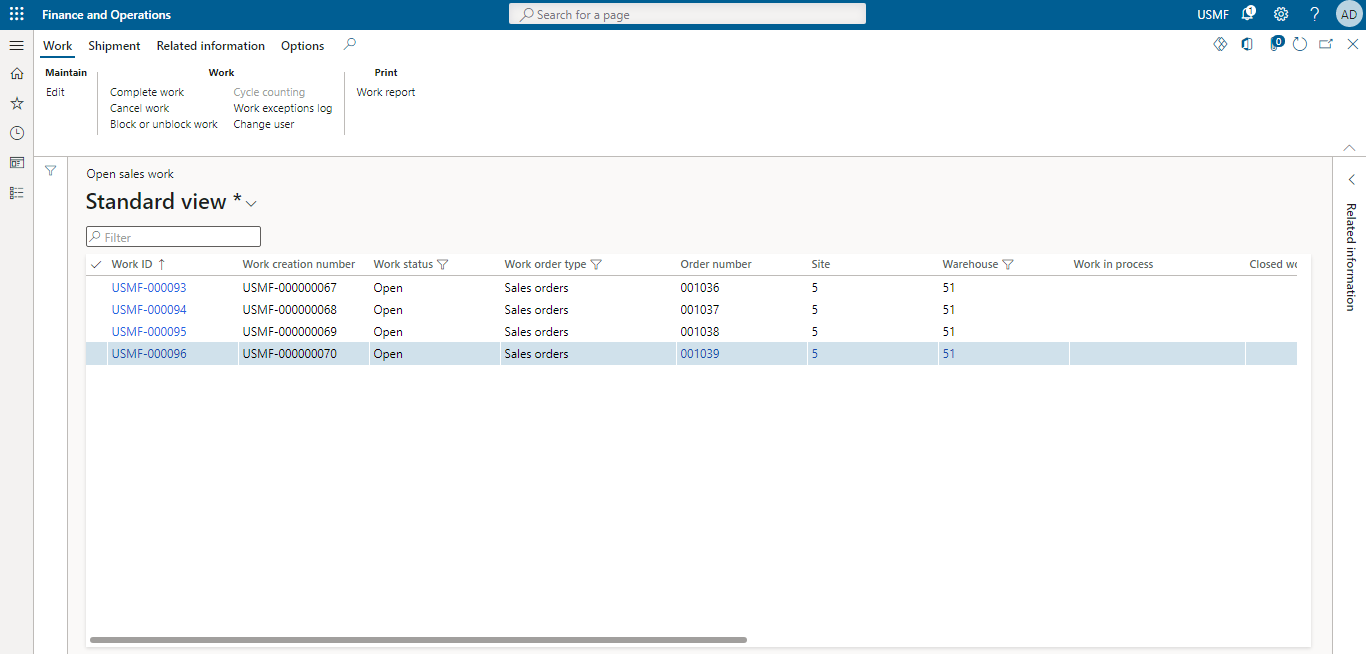
Go to Warehouse management > Work > Outbound > Open sales work.
Step 7
In the Open sales work grid, filter on the Warehouse field so that only work for warehouse 51 is visible.
Step 8
Confirm that only the four work IDs that we created earlier.
Step 9
Close the Work page.
SUMMARY
While setting up system directed sequence for your work order, you must know that work sequence queries are comprehensive. That means you must specify menu items with a selective work unit to make them available for processing.
What We Think About System-directed Sequencing?
All-inclusive, system-directed sequencing is a nice feature of Microsoft. However, we still see some room for improvement.
With standard operations, there is no way to limit the work in terms of volume, weight, or quantity. This will surely be a problem for most organizations considering the use of this feature.
In addition, you would have to ensure that the system is not assigning the work unfit for the employee regarding its characteristics.
Nonetheless, we can’t blame the system for not compiling with the custom needs of your organization. This is why we are here. You don’t have to add extra steps and processes to your workflow because the system demands so; it should be the other way around.
At Instructor Brandon | Dynatuners, we always seek innovative methods to improve your competitiveness and suit your Microsoft Dynamics 365 requirements. Our offerings are founded on defined procedures, industry experience, and product understanding. If you’re interested in consulting with our specialists on how it may benefit you to customize the system-directed work sequencing according to your warehouse flow and maintain the accuracy of your order with ease, don’t hesitate to Contact Us.
[sc_fs_multi_faq headline-0=”h2″ question-0=”What is Work Order Management? ” answer-0=”A systematic approach to processing and completing the list of tasks promptly to minimize asset downtime is known as work order management. The completion of the work order depends on the availability of resources, including assets, parts, people, and planning, of course. ” image-0=”” headline-1=”h2″ question-1=”Why is it essential to sequence work orders in a project? ” answer-1=”Work Order Sequencing is the process of identifying and documenting relations among the project activities. A benefit of sequencing is that it places a logical order of work, which in turn will help the project team work more efficiently. ” image-1=”” headline-2=”h2″ question-2=”What are the three performance criteria of sequencing? ” answer-2=”The performance criteria of sequencing rely on the fewest number of operations remaining, the minor work remaining, and the Least amount of work being at the next process queue. ” image-2=”” headline-3=”h2″ question-3=”What are the rules of sequencing? ” answer-3=”The 8 sequencing rules to consider are SIPT (Shortest Imminent Processing Time), EDD (Earliest Due Date), DLS (Dynamic Least Slack), LWQ (Least Work in next Queue), FIFO (First In First Out), LIFO (Last In Last Out), CR (Critical Ratio), and LS (Least Slack). ” image-3=”” count=”4″ html=”true” css_class=””]
 5408
5408 


