Data Model Series, Dynamics 365 Tutorials
Techno-Functional Dynamics 365 F&S Data Model Explanations for Reporting, Part 1 of 25 – Purchase Order Creation Tables
Introducing The Dynamics 365 Techno-Functional Data Model Series
Things have changed a lot since I started blogging over a decade ago. There are so many wonderful topics to blog and learn on today; it seems like one doesn’t even know where to start. To make the process more friendly, I’ve introduced a new sort of post — the hybrid video/blog tutorial. In this series, we will produce a video and blog for every topic covered. Some very talented developers from my team have contributed their expertise to assist with this content/video approach to ensure that we keep our quality and quantity high. I hope you all sincerely enjoy the new approaches that we’ve innovated.. And as always, don’t hesitate to reach out to me.. I’m always here to help. — Brandon Ahmad
Today we begin a series of techno-functional walkthroughs of the 25 core business processes in Dynamics 365. As you probably know, this information is compiled nowhere else. Techno-functional understanding of Dynamics 365 is typically obtained over years by the hunt-and-peck method as problems arise. But, by the end of this series you will have met the entire application, and have the level of understanding that makes a big data model make sense. And you will have the foundation for being the data model wizard!
In each article we will (1) navigate to the pertinent screens and functionally perform the transaction, and (2) explore the technical action that takes place in the data model. Note, we believe in hands-on learning. If you can, access a safe Dynamics 365 instance and perform these steps as you read, you will find that you get a real grasp of the material when you read and do.
Open the initial navigation pane by clicking the ![]() icon in the upper left corner of your D365 client.
icon in the upper left corner of your D365 client.
Each functional walkthrough begins at the initial navigation pane. Note that our examples occur in a vanilla, out-of-the-box instance populated by a Contoso demo database (where possible). We will assume familiarity with basic relational database terms such as master/detail and header/detail relationships, tables and records, and primary and foreign keys.
Let’s get started with one of the most frequently-customized processes in the application – the Purchase Order process.
Functional walkthrough: Manually create a Dynamics 365 purchase order
Here is the functional process flow for entering a Dynamics 365 purchase order:

Now let’s perform the function.
Step 1:
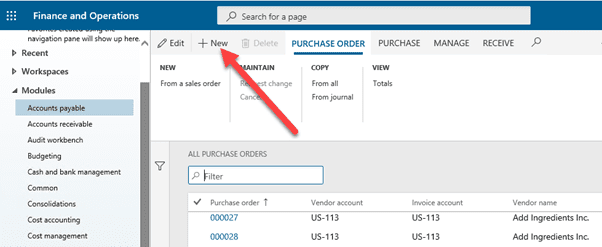
First, select the ‘Accounts payable’ module, then the Purchase Orders workspace; click on ‘All purchase orders.’

Step 2:
Then click on the ‘+ New’ tab to manually create a new purchase order.
Step 3:
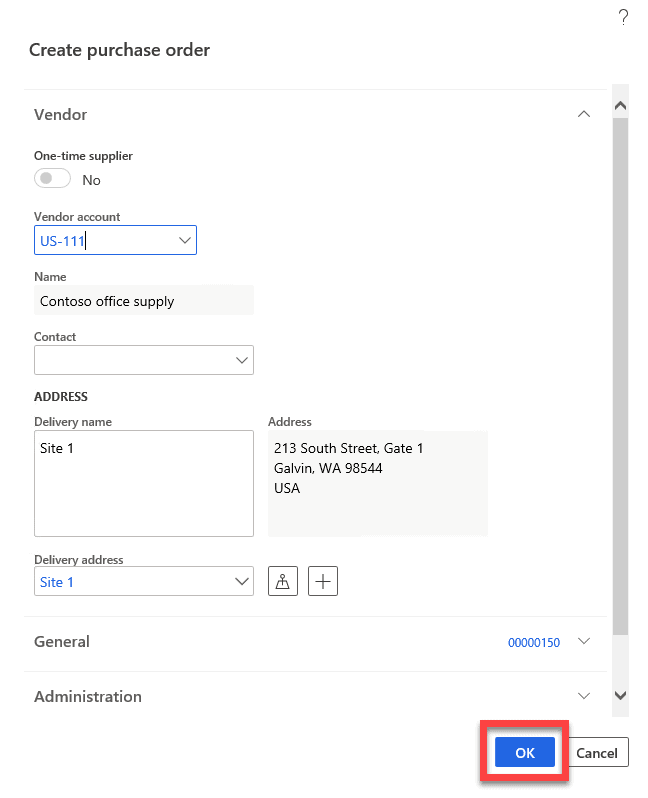
After that, click inside the ‘Vendor account’ field to see a list of values, select any value and let its associated information auto-populate the rest of the purchase order header.
Step 4:
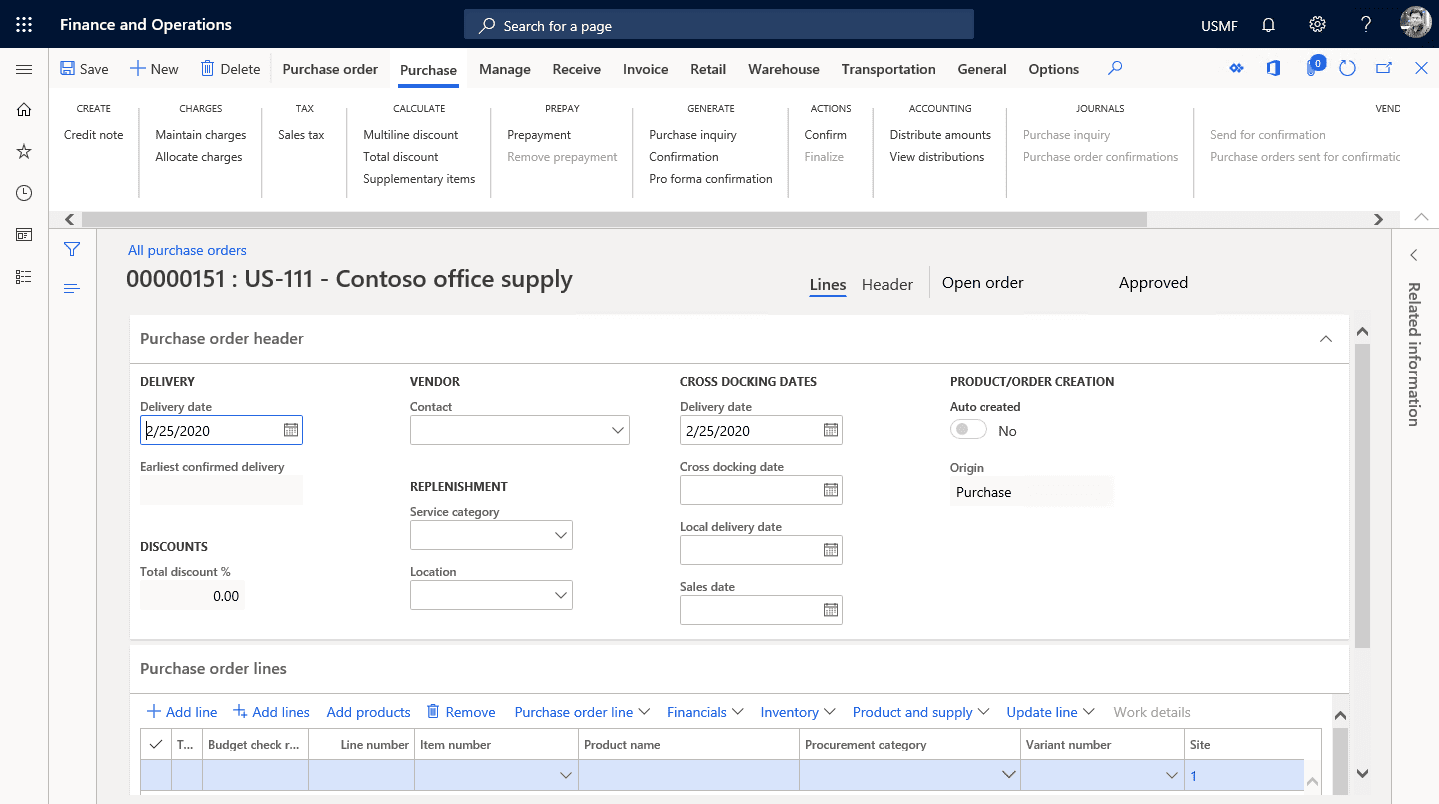
Then click ‘OK’ to create the Purchase. This will bring up the following display. Note that the ‘Lines’ view option is active (underscored) by default. This upper area of this view shows the ‘Purchase order header’ record that you just created, while the lower section shows the ‘Purchase order lines,’ which we will create shortly.
Step 5:
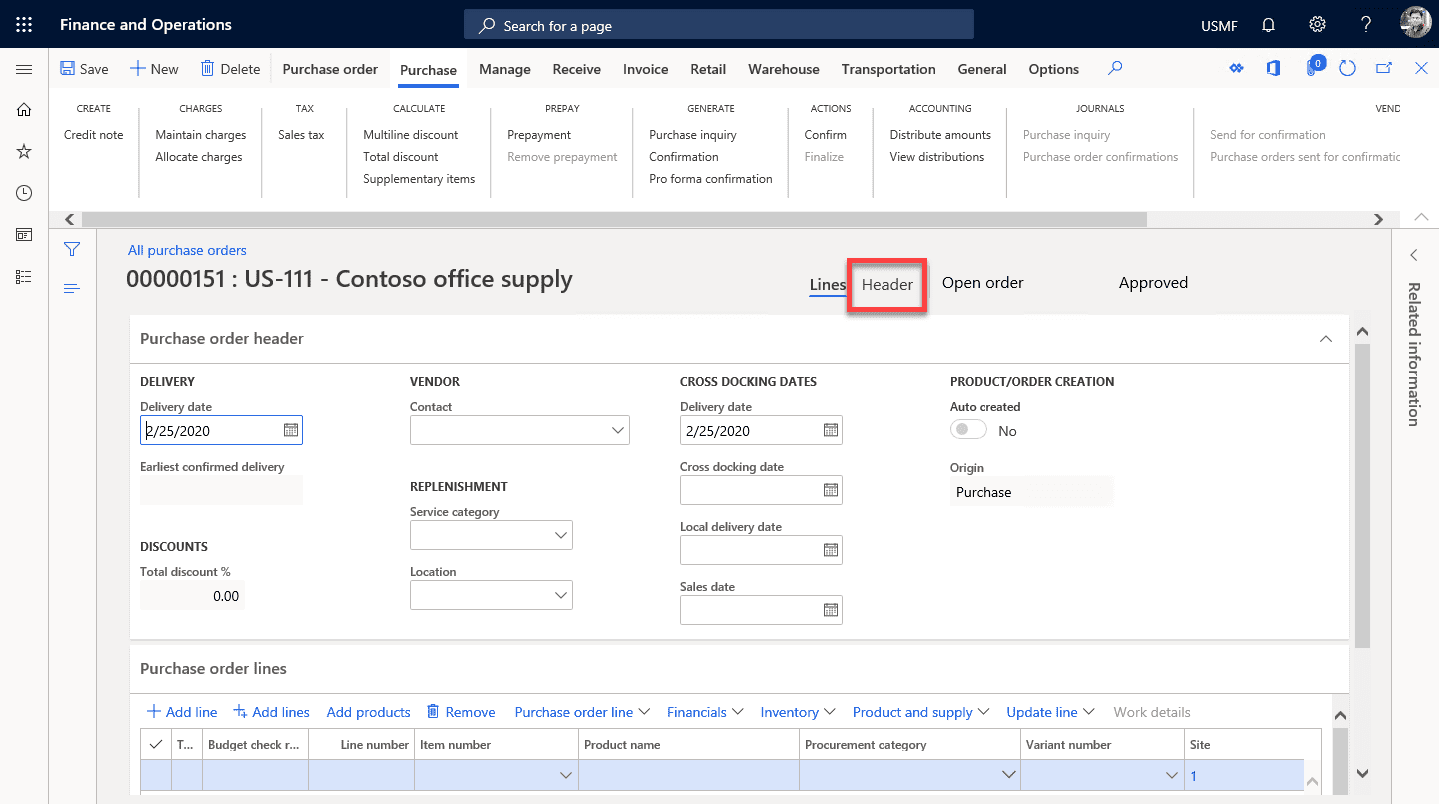
But first, we need to drill deeper into the header record to add some critical information. Click on the ‘Header’ view option.
Step 6:
Notice the ‘Storage Dimensions’ in this more detailed view of the purchase order header record below. In Dynamics AX, “dimensions” are key identifying characteristics and categories (a.k.a. attributes) associated with an entity – in this case, a purchase order. Purchase orders have storage dimensions, which indicate where you want the purchased item to be expected and ultimately received and stored. Select a site and warehouse for your purchase order.
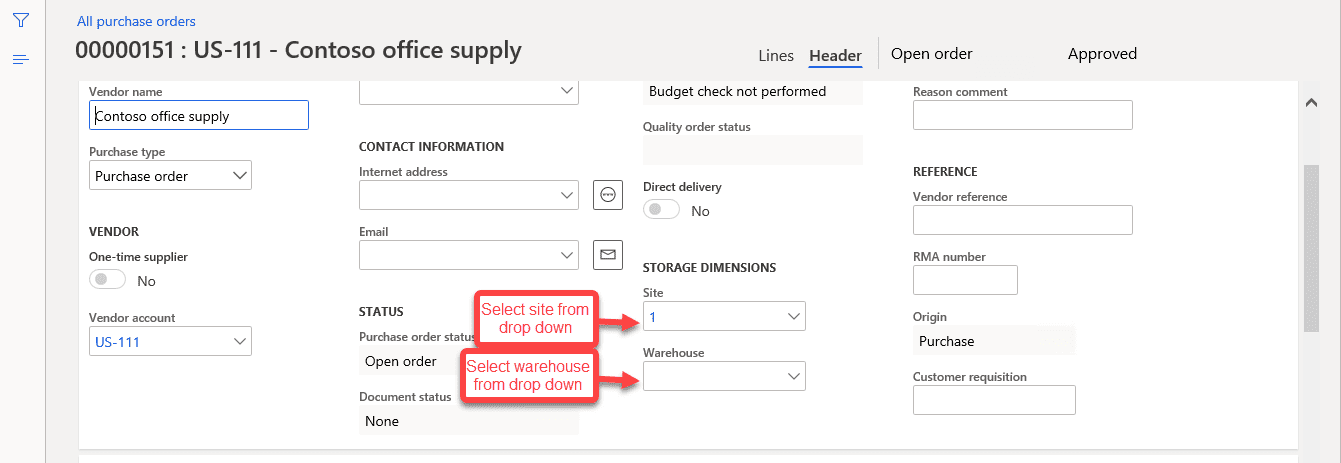
Step 7:
Now click on the ‘Lines’ view option to return to the previous display. The Purchase Order lines tab of your new purchase order will have one empty line automatically added. Click on the ‘Item Number’ column and select any item for your purchase order line item.
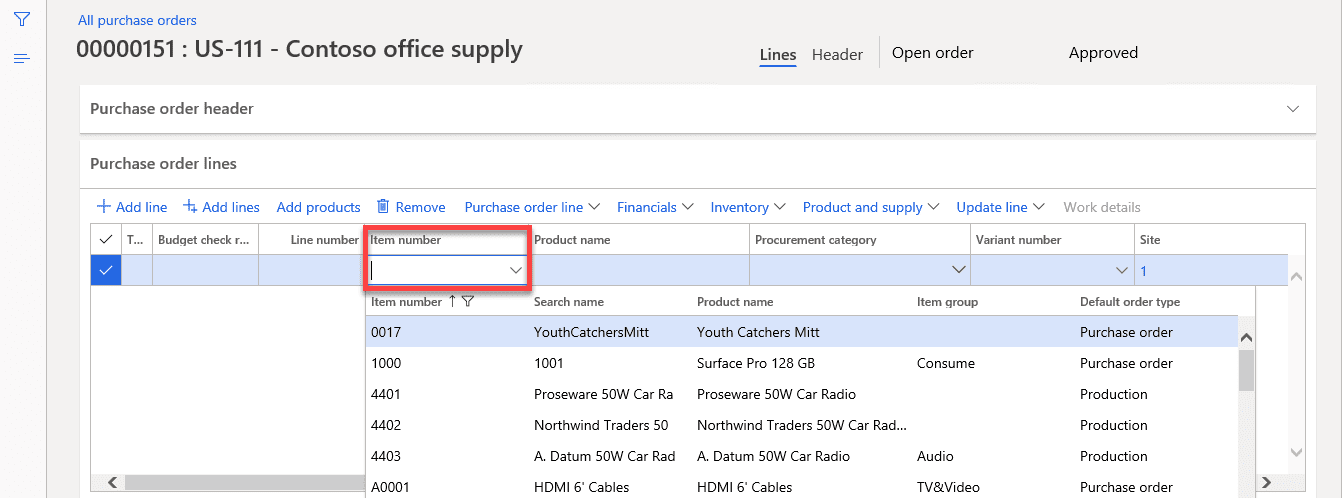
Step 8:
Finally, at the top of the purchase order display click on the Purchase tab; under the Actions group click ‘Confirm’ to validate that the PO is legitimate and acknowledged for a valid bill.

Technical walkthrough: the data model behind Dynamics 365 purchase order
Now, let’s cover the technical aspect of this process.
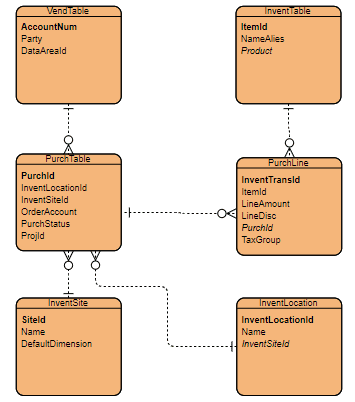
There are two principal tables in the purchasing process in Dynamics 365 Finance & Operations – one for Purchase Orders, and another for Purchase Order Line Items.
Here we have included ERD so you can see what’s going on in the purchase order process.
Entity Relationship Diagram:
In the graphic below you can see the principal tables behind our functional walkthrough.
Although the functional examples in this series will focus on transaction screens, it is important to understand that we can also create a purchase order by using X++ code. Here is a runnable class (job), which creates a simple Dynamics 365 purchase order header record and a line item record:
[sourcecode language=”c-sharp”] class RunnableClassForPO{
public static void main(Args _args)
{
NumberSeq numberSeq;
PurchTable purchTable;
PurchLine purchLine;
VendTable vendTable;
boolean isVendorOnHold;
ttsBegin;
// geting number sequence
numberSeq = NumberSeq::newGetNum(PurchParameters::numRefPurchId());
numberSeq.used();
// Asign purch id
purchTable.PurchId = numberSeq.num();
// calling table initvalue method to initialize default values
purchTable.initValue();
// Find vendor for Purchase order creation
vendTable = VendTable::find(‘US-101’);
// check if vendor is not on hold for any kind of transaction
isVendorOnHold = !(vendTable.Blocked == CustVendorBlocked::No || vendTable.Blocked == CustVendorBlocked::Never);
if(isVendorOnHold)
{
throw Error("Vendor with account no. %1, is on hold. Kindly choose another vendor.", vendTable.AccountNum);
}
// assign relevant data from vendor details
purchTable.initFromVendTable(vendTable);
// validation
if (!purchTable.validateWrite())
{
throw Exception::Error;
}
// insert data to create an empty Purchase order
purchTable.insert();
// Now we will insert lines to purchase order
purchLine.PurchId = purchTable.PurchId;
purchLine.ItemId = ‘1000’;
// Purch line creation
purchLine.createLine(true, true, true, true, true, true);
ttsCommit;
info(strFmt("Purchase order ‘%1’ has been created",purchTable.PurchId));
}
}
[/sourcecode]
Have a look at the primary tables
PurchTable
In addition to storing the header information of the purchase orders, this table is an extremely useful source of reporting data on its own. Here are some of the available data items in the table.
| Fields | Data Type | Description |
| PurchId | string | Purchase order ID, also a primary key. |
| PurchName | string | Optional purchase order name. |
| ProjId | string | Associated project ID’s, if any. |
| PurchStatus | Enum | Purchase order status (Open order, Received, Cancelled or Invoiced). |
| InventLocationId | string | Location information about the created purchase order. |
| InventSiteId | string | Site information about the created purchase order. |
| OrderAccount | string | Vendor’s account number for which the purchase order is created. |
| InvoiceAccount | string | Internal Account number on which invoice will be posted. |
| DeliveryDate | datetime | Promised delivery date. |
Some examples of reports that could be drawn from this data are:
- Open/closed purchase orders by vendor, site or internal account
- Project purchase order activity for a date range
- Late/on-time purchase orders by vendor or site
PurchLine
This is another principal table in the mechanism of the purchasing process in Dynamics 365 Finance & Operations. As the name suggests, this table stores purchase order line items related to each purchase order master record, linked by sharing the same purchase order id (PurchID). Now let’s looks at some important fields of the ‘PurchLine’ table:
| Fields | Data Type | Description |
| PurchID | string | Unique identifier of the master purchase order record |
| PurchLineID | int | Unique identifier of this line item |
| LineNo | int | Line item number, assigned by sequence |
| ItemId | string | Unique identifier of the item being purchased in this line item |
| PurchQty | int | Quantity of ItemID purchased in this line item |
| PurchPrice | int | Price per item of ItemID |
| LineDisc | int | Amount of discount applied to this line item |
| LineAmount | int | Total price for this line item |
| Tax Group | string | Unique ID for tax group for this line item |
By itself this table supplies information for many more useful reports such as:
- get the price change trend of a single item or multiple items for future planning.
- report discounts, taxes, and the number of specific items we purchased in the past.
- determine how many items we have purchased against a project.
Summary
In this post, we
- functionally introduced the Dynamics 365 Purchase Order transaction process
- looked at a sample batch transaction in X++
- technically examined the data model behind the transaction
- explored PurchTable and Purchline, the main tables behind creating a Dynamics 365 purchase order.
We sincerely hope that you enjoyed part 1 of our exciting series on the Dynamics 365 data model. We aim to provide quality service at all times. And as always, if you need to reach me, you know how to get in touch by reaching out to me here. — Brandon Ahmad, founder of InstructorBrandon and Dynatuners

 20713
20713 

Great post as always Brandon. A couple of errors in the runnable class though – numberSeq isn’t defined, and PurchLine is spelt with an ‘e’ in the declaration.
Oh, thank you so much, Joe… One of our screenshots was taken of the code before it was finished, and somehow got included in this post during our editing process — most likely because we have been editing 25 posts at once while developing on so many implementations lately. You are right.
Also, I think you will like the custom validation on the vendor that was included in the final process but not posted as this is extremely common when we create these purchase orders. Thanks so much, Joe. We posted an incomplete example and you helped spot it right away. Please let us know if you see anything else in the rest of the series. We are always grateful for an extra set of eyes.