Consulting, Microsoft Dynamics AX
Dynamics AX 2012, how to create a Release Order against a Purchase Agreement with value commitments
So today, we deal with a process based question. Basically you need to create a released order against a purchase agreement. Purchase agreements are useful when you want to create several invoices against a specific vendor, or you want to make an agreement with someone with special terms – for example, they have to buy 50,000 products in one year but they get a 10% discount for doing so. When you create a purchase order against a trade agreement, it is known as a release agreement. Now, within release agreements, you have two main types – quantity and value. Quantity means that you say that someone must purchase this exact quantity of goods – like 50,000 products. Value is when you state that someone must buy this exact monetary amount of product, such as $200.00.
When creating release orders against purchasing agreements with value commitments, you have to go about the business of adding item quantities in a different way. See this post for that…
To put it more eloquently, see this quote by Microsoft:
“Only commitments of the Product quantity commitment type are available in the Create a new release order form. To create a purchase release order from commitments of the Product value commitment type, you must first create a purchase order, and then you can add purchase order lines for these items.”
— http://technet.microsoft.com/en-us/library/hh545520.aspx
So, what do you do?
1. Create your Purchase Order the Standard Way (Procurement and Sourcing --> Area Page --> Common --> All Purchase Orders and click the “Purchase Order” button in the New tab of the action pane menu)
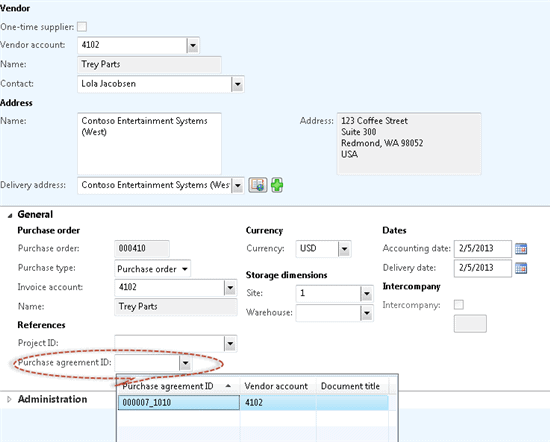
2. Make sure that the vendor in our purchase agreement matches the vendor in the trade agreement. And then, under the general tab, click the General --> and fill-in or select the data for the Purchase agreement ID. That converts the Purchase Order to a release order.

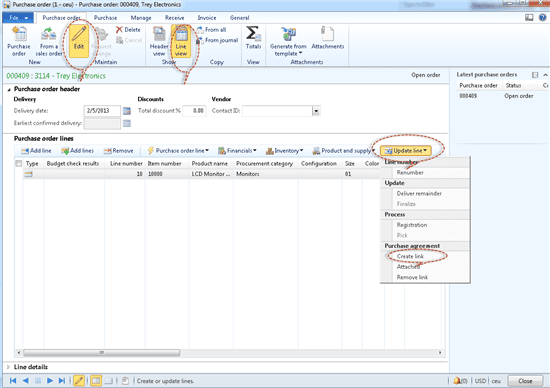
Once that is done and you have created the purchase order (aka release order since you added the reference to the purchase agreement id), you then need to open up the purchase agreement. Switch to Line View. And begin adding lines. Add your lines first. Then click the Update Line option and Choose “Create Link” to link those individual lines to the purchase agreement. And see the screenshot for the finish.

Now, go enjoy your life. You made your client happy. 🙂
Brandon Ahmad,
Microsoft Certified Trainer
The Dynamics AX Instructor

 15774
15774 
